Autotask integration
Autotask
PERMISSIONS API User
myITprocess
NAVIGATION My Account > Account Settings > Integrations > Connect PSA
PERMISSIONS IT Provider Admin
Overview
Take advantage of this integration to automate multiple day-to-day workflows. Mapping your Autotask and myITprocess organizations ensures valuable data is not lost in the width of isolated tools.
Opting to sync Autotask contracts into myITprocess completely centralizes your contract management to track recurring investments. Streamline lifecycle tracking, protect revenue, and link agreements directly to IT roadmaps, budgets, and KPIs to drive smarter planning and higher-impact QBRs.
Automatic creation of Autotask opportunities from client-approved projects in myITprocess allows project details to flow directly into Autotask, ensuring seamless execution and no manual re-entry.
Converting myITprocess recommendations into Autotask tickets saves time, reduces oversight, and allows you to take instant action on newly discovered technology risks.
Kaseya 365This integration is included as part of a Kaseya 365 Ops subscription and will be configured for you in a session with an implementation consultant from Kaseya. Refer to Getting started with Kaseya 365 Ops. |
Automations powered by this integration
- True Sync for Autotask Contracts: True Sync for Autotask Contracts
- QuickAction for Autotask Opportunity: QuickAction for Autotask Opportunity
- QuickAction for Autotask Ticket: QuickAction for Autotask Ticket
How to...
You have the option to set up a custom security level in Autotask with minimum permissions that you can use specifically for managing this integration with myITprocess. Complete the following steps in Autotask to do so:
- Navigate to Admin > Organization Settings & Users > Resources/Users (HR) > Security Levels.
- From the context menu for the API User (system) security level, which is configured with the settings needed for the new security level you will create, select Copy.
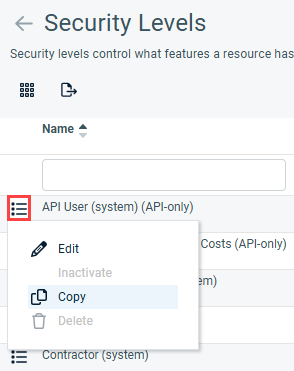
- Enter a name indicating that this security level is used for the integration with myITprocess.
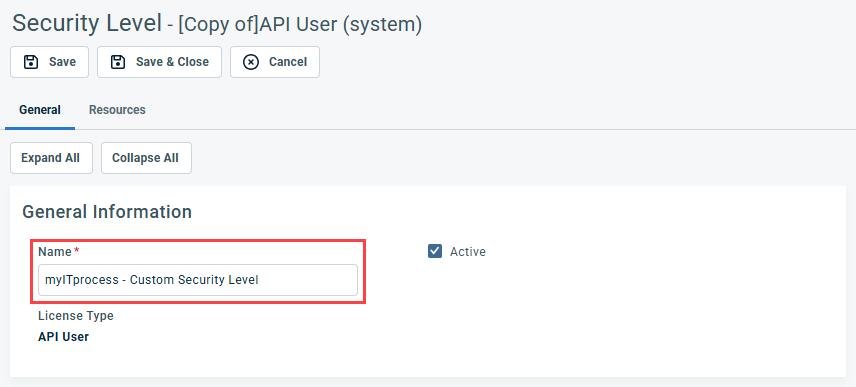
- Click Save & Close.
Autotask allows you to create API-only access user types for the purpose of OAuth integrations with other applications. An Autotask security level with Admin permission to configure Resources/Users (HR) can complete the following steps to create credentials for an API user in Autotask, which will not have access to the Autotask user interface. The API user credentials configured in the following steps will be used for connecting this integration:
- Navigate to Admin > Organization Settings & Users > Resources/Users (HR) > Resources/Users.
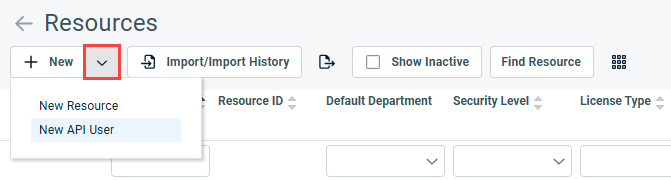
- From the New drop-down menu, select New API User.
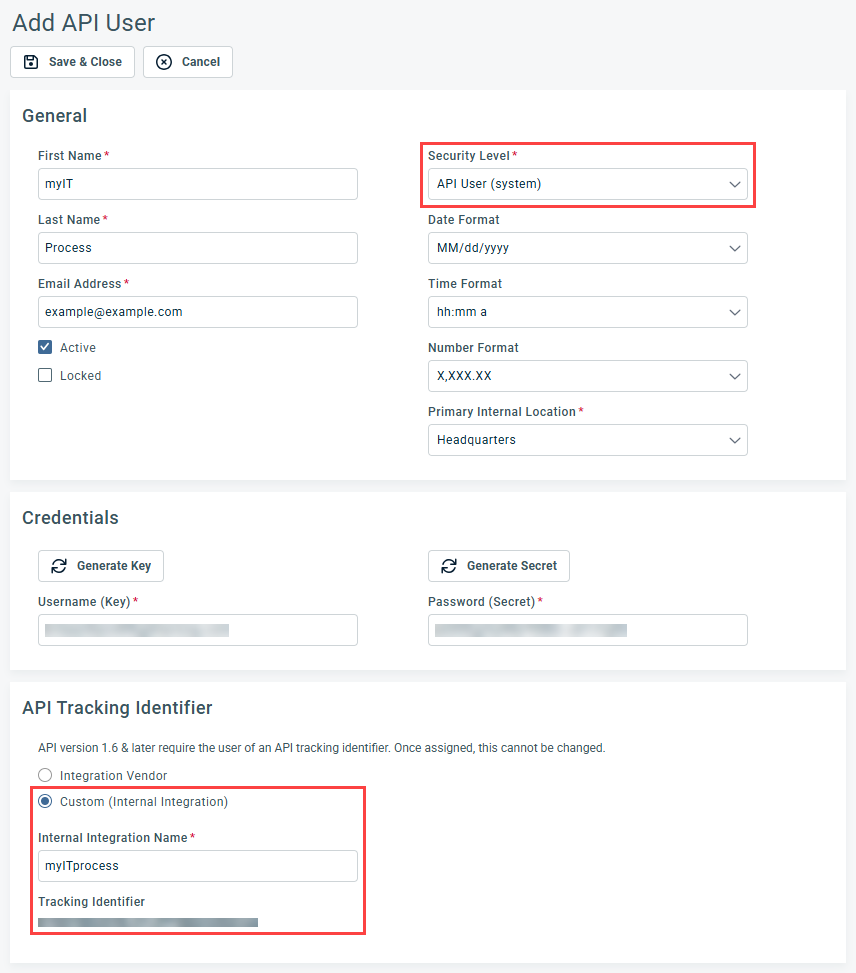
- In the General section, fill in the required fields. From the Security Level drop-down menu, select API User (system) or the custom security level you set up in Create a dedicated security level in Autotask (optional).
- In the Credentials section, click Generate Key and Generate Secret to populate those fields. Copy and securely save these values, which you will later enter in myITprocess.
- In the API Tracking Identifier section, select Custom (Internal Integration).
- In the Internal Integration Name field, enter myITprocess.
- Copy and securely save the Tracking Identifier value, which you will later enter in myITprocess.
- Click Save & Close to create the new user and receive an email with login credentials.
NOTE When creating the API user, it's important to take note of the credentials you create, as you cannot recover the Password (Secret) value from the user record in Autotask once it has been saved.
Learn more about API users in the Autotask Help system.
- In the upper-right corner of the header, click your username (My Account) and select Account Settings.
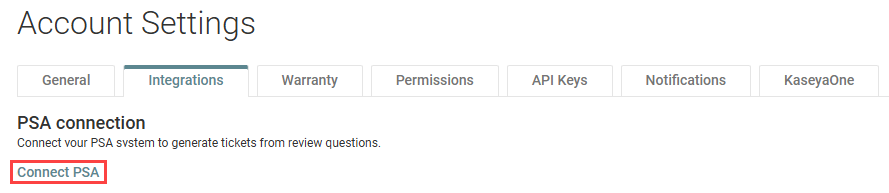
- Click the Integrations tab.
- In the PSA connection section, click Connect PSA.
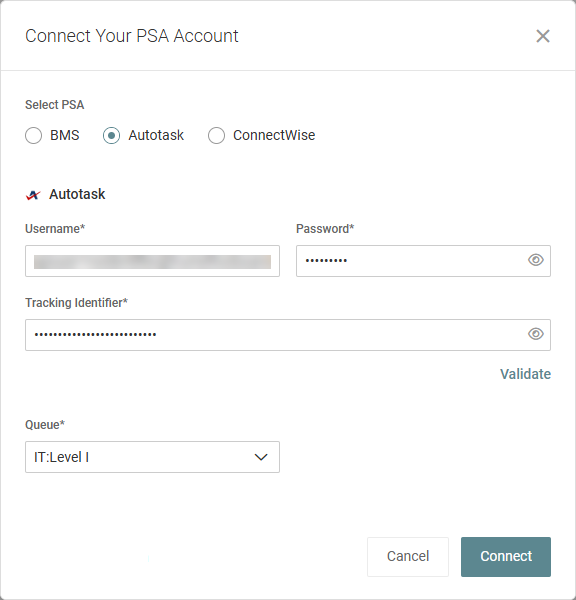
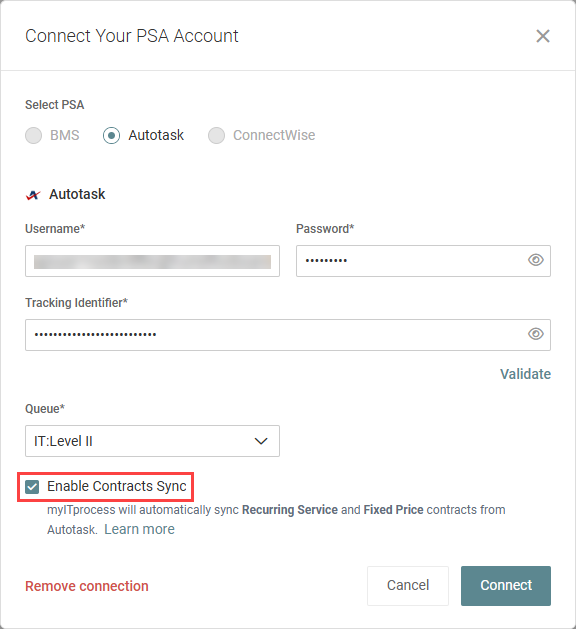
- In the Connect Your PSA Account dialog box, select Autotask.
- In the Username field, paste the Username (Key) value you generated in Create a dedicated API user in Autotask.
- In the Password field, paste the Password (Secret) value you generated in Create a dedicated API user in Autotask.
- In the Tracking Identifier field, paste the Tracking Identifier value you generated in Create a dedicated API user in Autotask.
- Click Validate.
- Once all fields are successfully validated, select an active Autotask queue to which tickets created in myITprocess will be sent. Learn how to create queues in the Autotask Help system.
- Select the Enable Contracts Sync check box if you wish to automatically sync contracts from Autotask organizations and track recurring investments through this integration. Learn about creating and managing contracts in the Autotask Help system.
- Click Connect to connect myITprocess to Autotask.
BEFORE YOU BEGIN You must add your organizations (clients) in myITprocess before you can associate them with your organizations in Autotask. Learn about adding myITprocess organizations in the myITprocess Help system and adding Autotask organizations in the Autotask Help system.
The option to sync myITprocess organizations with their corresponding Autotask organizations is available when creating organizations and for existing organizations.
To map existing myITprocess organizations to their corresponding Autotask organizations, complete the following steps in myITprocess:
- In the upper-right corner of the header, click your username (My Account) and select Account Settings.
- From the left navigation menu, click Setup Organizations.
- In any organization row, click the Autotask (Ticketing) value (either None or the currently mapped Autotask organization) to select or change the Autotask organization to map to the myITprocess organization. To narrow the list, start typing an organization name in the field. To refresh the synced data, click Refresh.
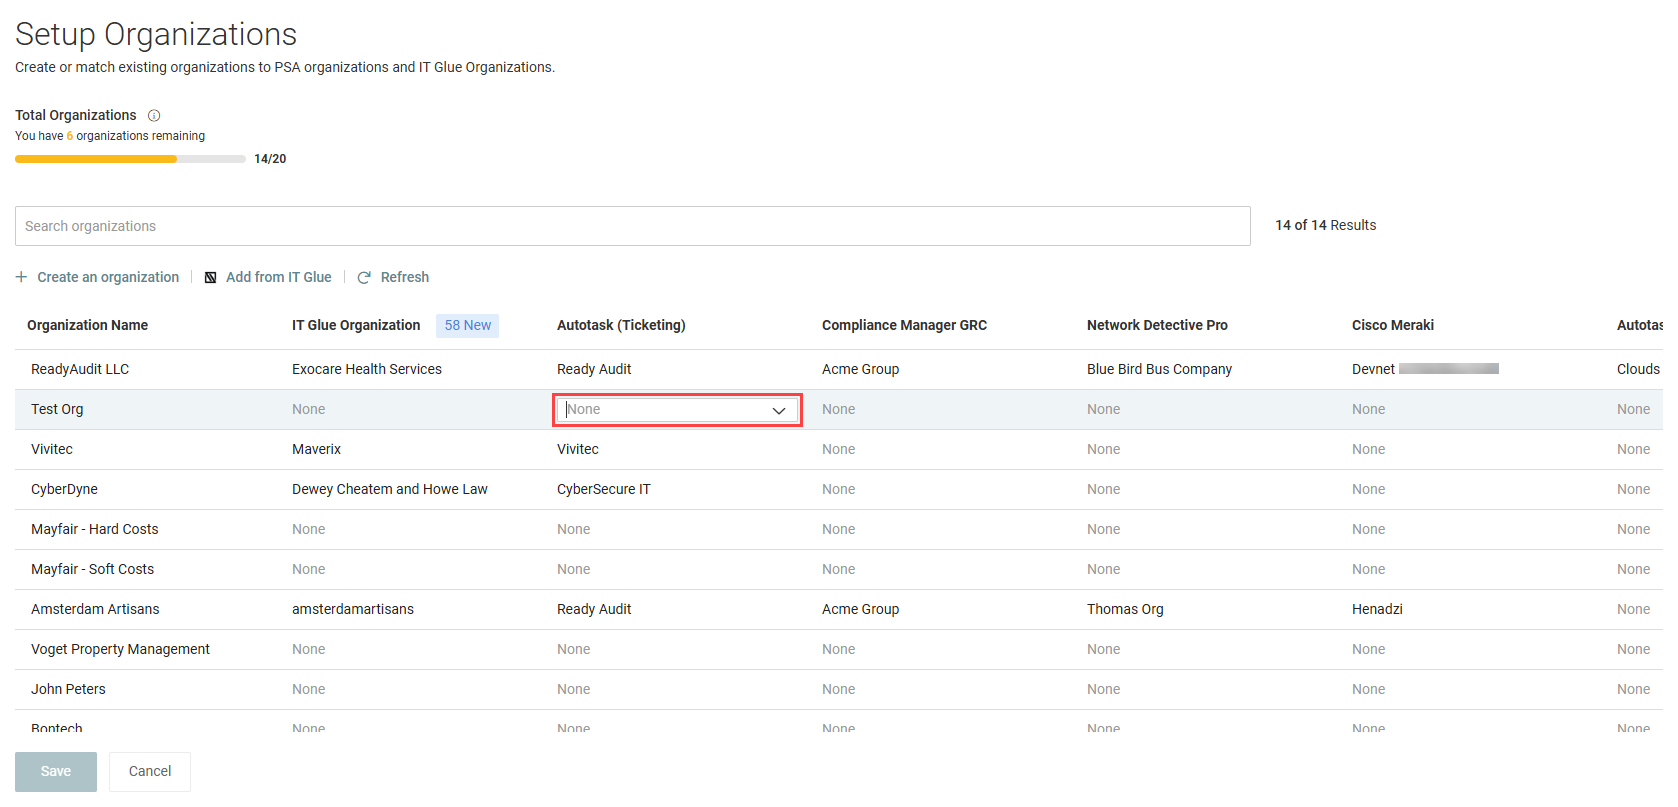
- When finished configuring the mappings, click Save.
This option is also available from the Organizations page in myITprocess. Complete the following steps:
- In the top navigation menu click Organizations.
- Click an organization in the list.
- From the three-dot menu
 for the organization, select Edit organization details.
- From the Autotask Organization Name drop-down menu, select the applicable Autotask organization to map this myITprocess organization to.
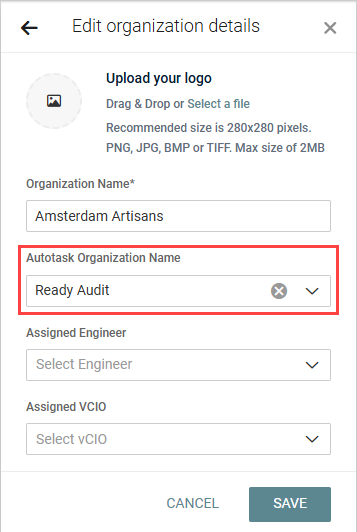
- Click Save.
NOTE If contracts sync is enabled, Autotask contracts automatically sync to myITprocess once their associated organizations are mapped.
To disable the integration, complete the following steps in myITprocess:
- In the upper-right corner of the header, click your username (My Account) and select Account Settings.
- Click the Integrations tab.
- In the PSA connection section, click Update.
- Click Remove connection.
- The confirmation dialog box will indicate that all Autotask opportunities and tickets created through this integration will be deleted in Autotask if you proceed with this action. Click OK to disable the integration and delete all associated Autotask opportunities and tickets or Cancel to close out of the dialog box.
True Sync for Autotask Contracts
The following sections describe how to leverage the True Sync for Autotask Contracts automation that is part of this integration.
Learn about creating and managing contracts in the Autotask Help system.
BEFORE YOU BEGIN The Enable Contracts Sync check box must be selected in the integration settings.
If contracts sync is not already enabled, complete the following steps:
- In the upper-right corner of the header, click your username (My Account) and select Account Settings.
- Click the Integrations tab.
- In the PSA connection section, click Update.
- Select the Enable Contracts Sync check box.
- Click Connect.
Contracts from mapped Autotask organizations automatically sync to myITprocess. For organization mapping instructions, refer to Map myITprocess organizations to Autotask organizations.
The following types of Autotask contracts are synced:
- Recurring Service: This type of contract includes only services and service bundles.
- Fixed Price: This type of contract includes only milestones.
Users see synced contracts only for the mapped organizations they have access to. To learn how to manage user access to organizations in myITprocess, refer to Using organization groups.
NOTE If a user does not have access to any of the mapped organizations, contracts synced from Autotask are not visible in their user account. If the Enable Contracts Sync check box is cleared in the integration settings, contracts synced from Autotask are no longer visible to any users in the account.
Contracts widget
The Contracts widget on the myITprocess home page provides a summary of the synced contracts.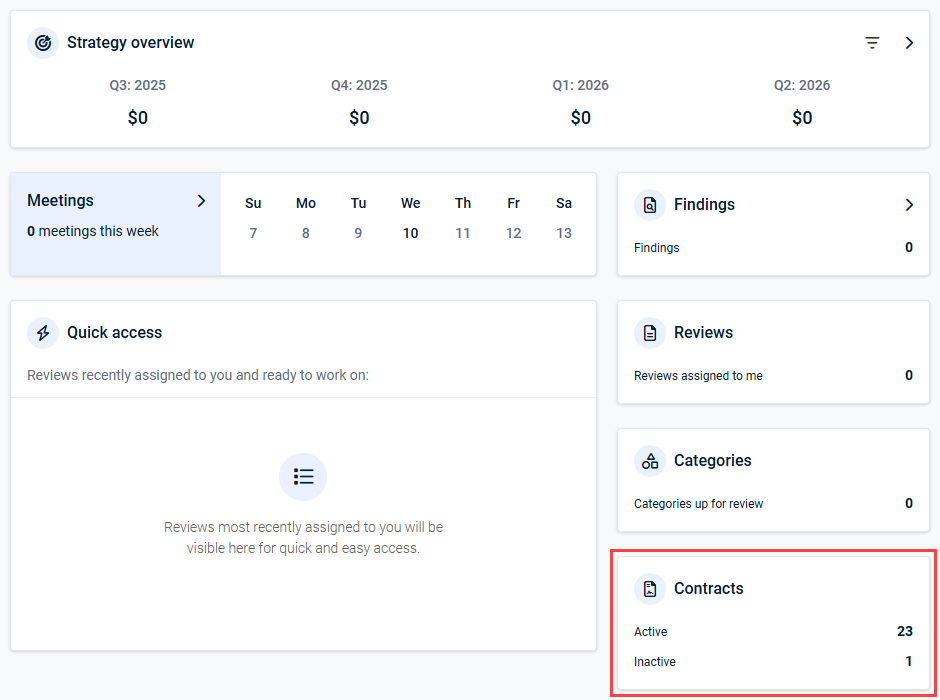
This widget displays the number of active contracts and the number of inactive contracts synced from Autotask organizations that are mapped to myITprocess.
NOTE The contracts and their budgets are not highlighted in the Strategic overview widget on the home page.
Contracts page
For a detailed view of the synced contracts, click the Contracts widget on the home page to open the Contracts page. You can also access this page from the menu in the upper-right corner of the Strategic Roadmap page.
Refer to Details tab in View individual contract details, services, and milestones for an overview of all contract details available in myITprocess, including the columns in this list.
Selecting an organization view
This page displays contract details per individual organization. Select the organization view from the drop-down menu in the upper-left corner of the page. The drop-down menu displays the total number of active and inactive contracts for each mapped organization the logged-in user has access to.
Searching and filtering
To search for specific contracts or narrow the list to reflect contracts that share certain details, start typing a keyword in the search box at the top of the page. You have the option to search by name, type, initiative, date (start, end, or first billing), budget, and status. The results are narrowed as you type.
To filter by specific values in the Type, Billing Cycle, Status, and/or Source columns, click the filter icon ![]() in the upper-right corner of the page and select applicable check boxes from the drop-down menus. To clear all filtering, click Reset.
in the upper-right corner of the page and select applicable check boxes from the drop-down menus. To clear all filtering, click Reset.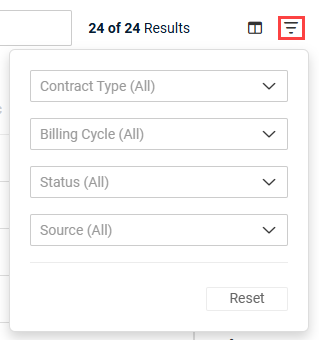
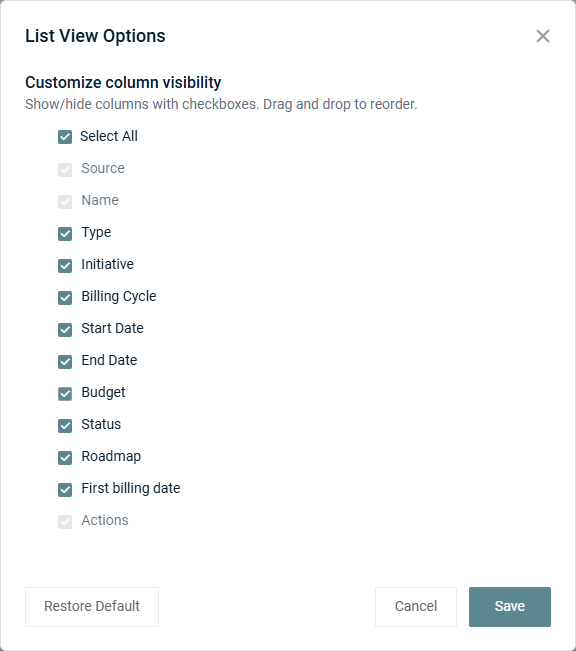
Configuring column visibility
To select which columns are shown in the list, click the column chooser icon ![]() in the upper-right corner of the page. The following options are available:
in the upper-right corner of the page. The following options are available:
- Select or clear individual column check boxes or the Select All check box.
- Drag and drop columns to change the order in which they appear in the list.
- Restore the default column visibility by clicking Restore Default.
NOTE The Source, Name, and Actions columns cannot be hidden from the list.
After clicking Save, your configured list view will persist if you navigate away from the page and return to it.
From the Contracts page in myITprocess, described in the preceding section, click the row of a contract to open its detail pane on the right side of the page.
For Recurring Services contracts, the Details tab and Services tab are displayed. For Fixed Price contracts, the Details tab and Milestones tab are displayed.
Details tab
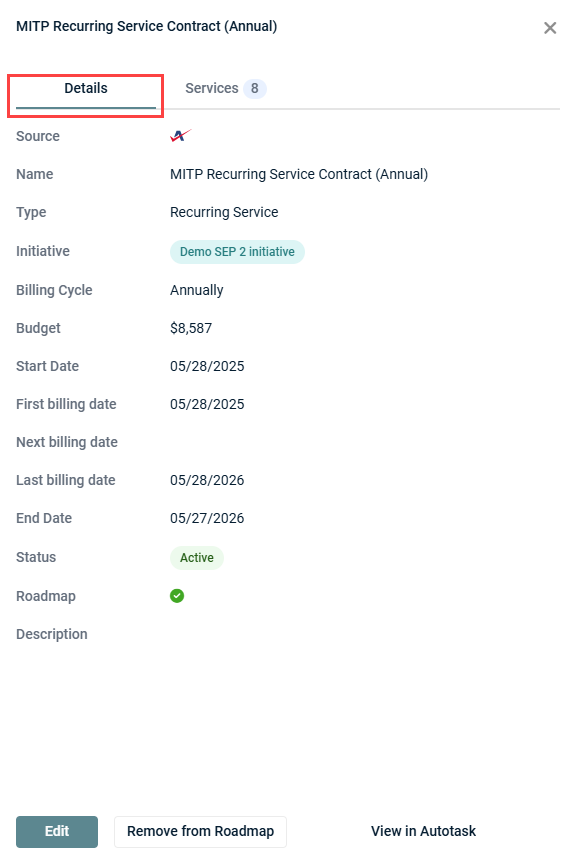
This tab displays all contract details. The following table outlines the contract fields available in myITprocess and the equivalent fields in Autotask that they are mapped to.
| myITprocess Field | Autotask Field | Description |
|---|---|---|
| Source | The Autotask logo indicates the contract is synced from Autotask. | |
| Name | Contract Name | Displays the contract name. |
| Description | Description | Displays the contract description, if applicable. |
| Type | Contract Type | Displays the contract type. The following types of contracts are synced from Autotask:
|
| Initiative | Displays the initiative the contract is assigned to, if applicable. To add a contract to a roadmap, it must be assigned to an initiative. Refer to Add or change the initiative a contract is assigned to. | |
| Billing cycle | Contract Period Type | Specifies how often the end user is charged for the contract:
|
| Budget | Specifies the amount a user will pay on renewal cycle. | |
| Start date | Start date | Indicates the date on which the contract starts or started. |
| First billing date | First billing date | Indicates the date on which the end user will be or was charged for the first time. |
| Next billing date | Next billing date | Indicates the date on which the end user will be charged next, if applicable. |
| Last billing date | Last billing date | Indicates the date on which the end user will be or was charged for the last time. |
| End date | End date | Indicates the date on which the contract expires or expired. |
| Status | Status | Active indicates the contract is active in Autotask. Inactive indicates the contract is inactive in Autotask. |
Services tab
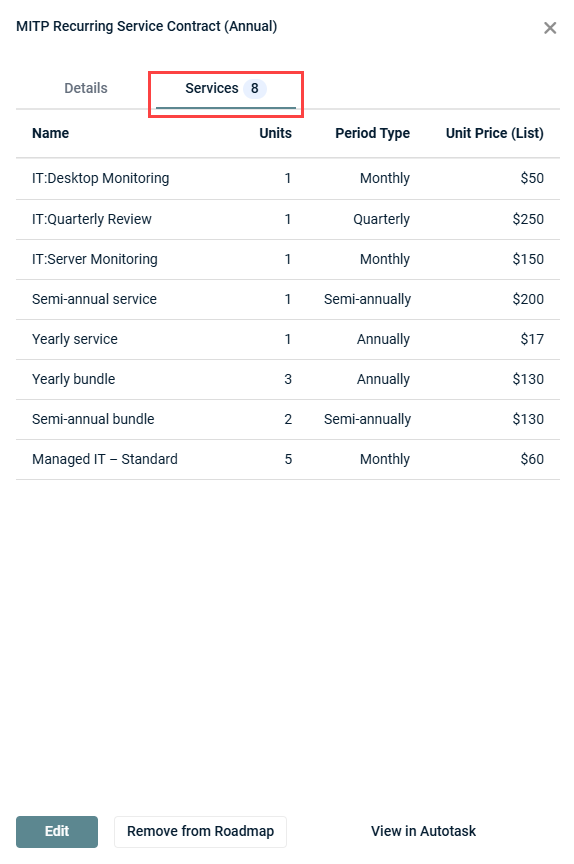
If the Recurring Service contract includes services, the service names, number of units, period types, and unit list prices are listed. Service bundles created in Autotask are listed as a single line item in myITprocess.
Milestones tab
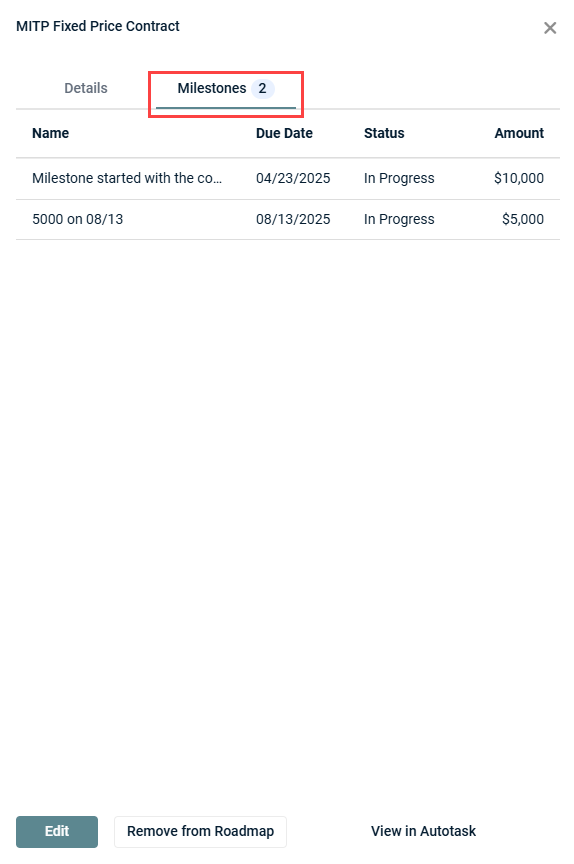
If the Fixed Price contract includes milestones, the milestone names, due dates, statuses, and amounts are listed.
NOTE If a contract has been added to the roadmap, this data is also available upon selecting the contract on the Strategic Roadmap page. Refer to View contracts on the Strategic Roadmap page.
You can open a contract in your Autotask account directly from the instance of the synced contract in myITprocess. While contract data cannot be edited in myITprocess (other than the assigned myITprocess initiative), opening the contract in Autotask directly from myITprocess allows you to edit the details as necessary, and changes will automatically sync to myITprocess.
Complete the following steps to open a contract in Autotask directly from myITprocess:
- In the top navigation menu click Home.
- Click the Contracts widget.
- From the Contracts page, select the organization you wish to manage contracts for from the drop-down menu in the upper-left corner of the page.
- Click the row of a contract to open its detail pane on the right side of the page.
- In the lower-right corner of the pane, click View in Autotask to open that contract in Autotask in a new tab. You are required to log in to your Autotask user account if not already logged in.
NOTE If a contract has been added to the roadmap, this option is also available upon selecting the contract on the Strategic Roadmap page. Refer to View contracts on the Strategic Roadmap page.
BEFORE YOU BEGIN To learn about myITprocess initiatives and how to create them from the Strategic Roadmap page, refer to Initiative and recommendation templates.
NOTE Once a contract is assigned to an initiative, the initiative can be changed but not removed.
If a contract is not already assigned to an initiative, the Initiative column is empty for that contract. If a contract is already assigned to an initiative, the Initiative column for that contract shows the name of the assigned initiative, which can be changed.
Complete the following steps to add or change the myITprocess initiative a contract is assigned to:
- In the top navigation menu click Home.
- Click the Contracts widget.
- From the Contracts page, select the organization you wish to manage contracts for from the drop-down menu in the upper-left corner of the page.
- In the Actions column for a contract, click the edit icon
 .
. - From the Initiative drop-down menu, select an initiative from the drop-down menu to assign the contract to it.
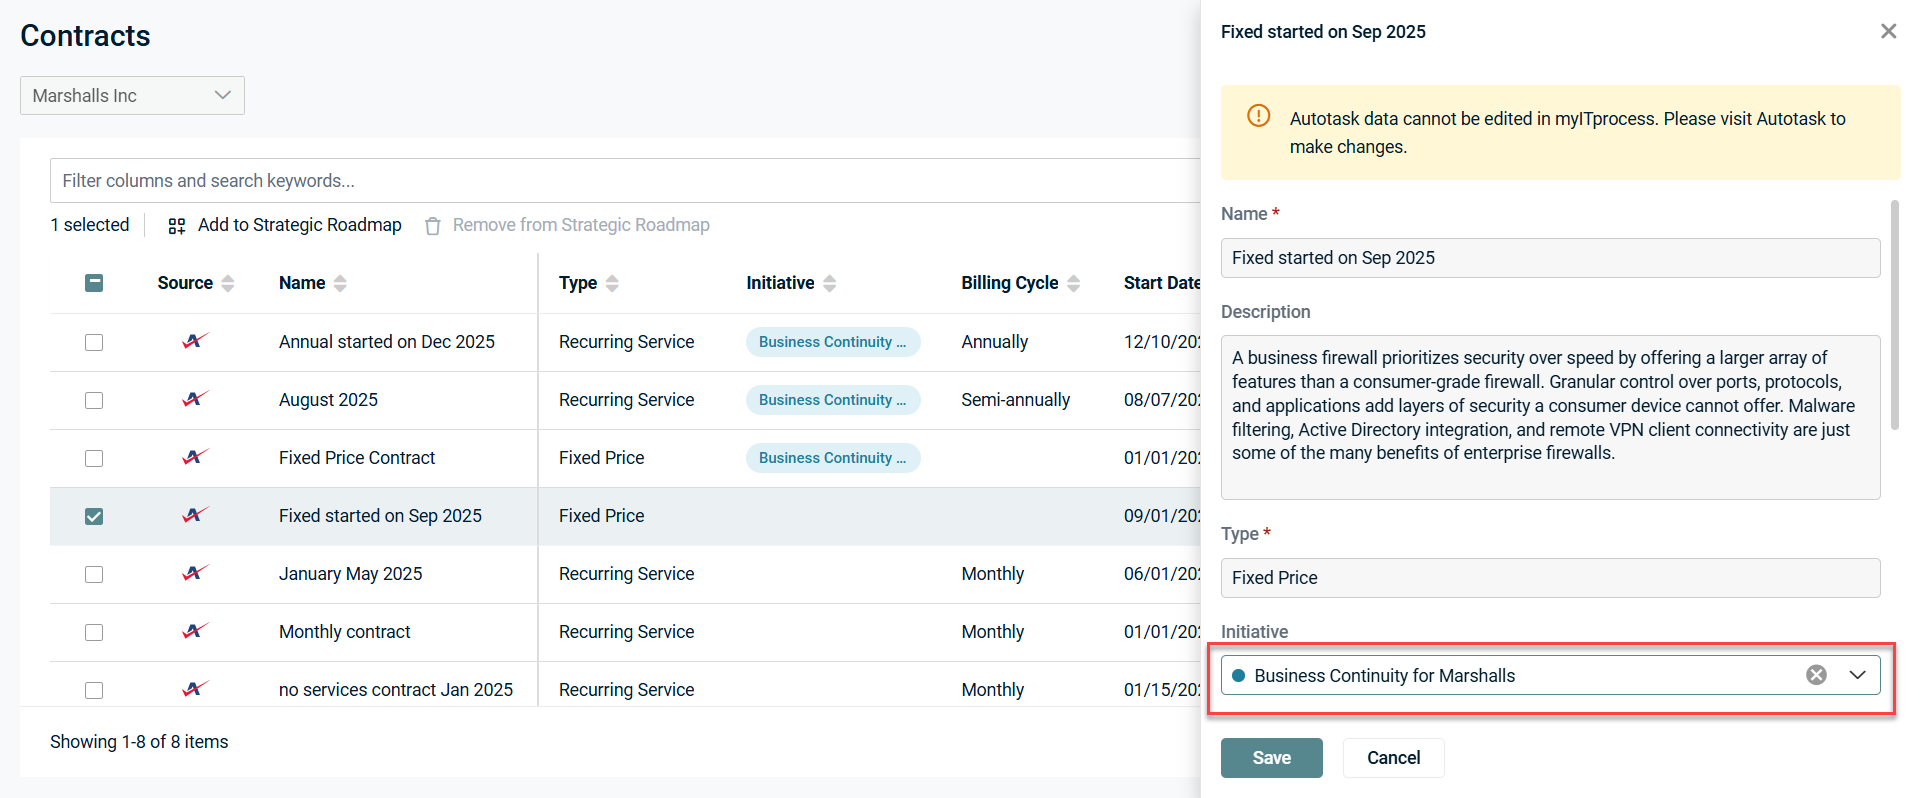
- Click Save.
NOTE If a contract has been added to the roadmap, the option to change the initiative is also available upon selecting the contract on the Strategic Roadmap page. Refer to View contracts on the Strategic Roadmap page.
BEFORE YOU BEGIN For a contract to be added to its organization's Strategic Roadmap, it must first be assigned to an initiative that aligns with your goals. Refer to Add or change the initiative a contract is assigned to.
To identify contracts you may wish to add to the roadmap, reference the Roadmap column on the Contracts page. The green check mark icon ![]() is displayed in this column for contracts already added to the roadmap.
is displayed in this column for contracts already added to the roadmap.
You have the option to add contracts to roadmaps individually or in bulk as follows:
- In the top navigation menu click Home.
- Click the Contracts widget.
- From the Contracts page, select the organization you wish to manage contracts for from the drop-down menu in the upper-left corner of the page.
- To add one or more contracts to the roadmap, select the check box(es) for the contract(s) and click Add to Strategic Roadmap in the upper-left corner of the list. Alternatively, click the row for a contract and click Add to Roadmap in the lower-left corner of the detail pane.
- If any of the selected contracts are not already assigned to an initiative, select an initiative from the drop-down menu. The initiative you select will be assigned to all contracts not already assigned to the selected initiative or any other initiative. Click Add.
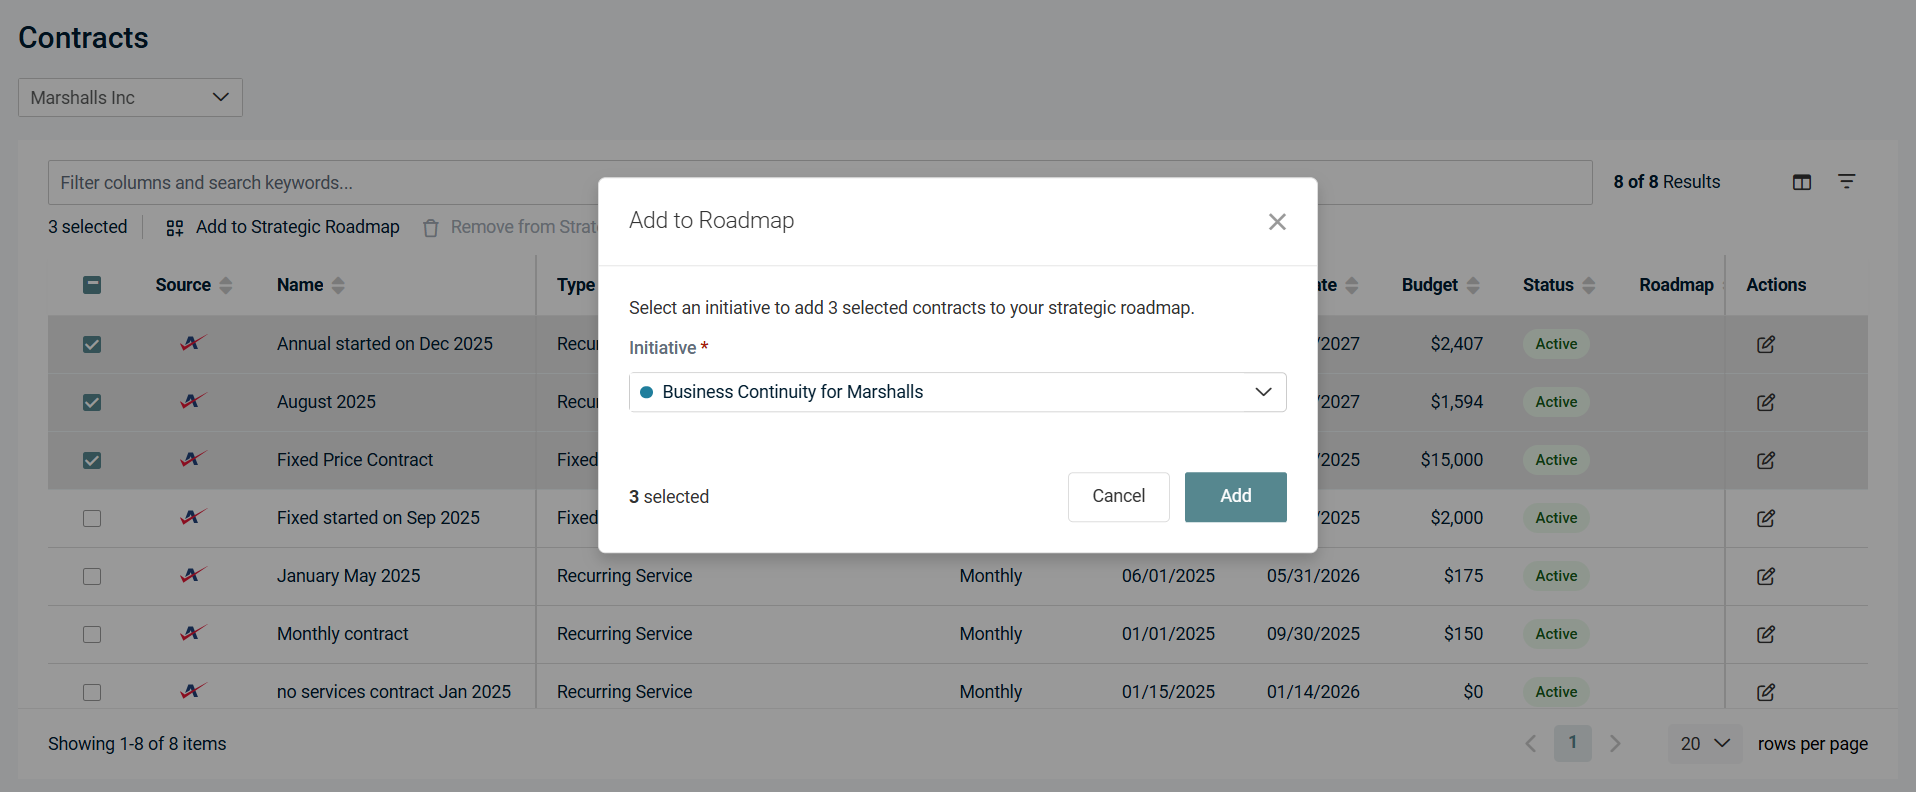
- In the confirmation dialog box, click Add. The added contract(s) will be visible on the Strategic Roadmap page for the organization.
NOTE This option is grayed out if all of the selected contracts are already assigned to the roadmap.
To remove one or more contracts from the roadmap, select the alternative option to remove the contract(s) from the roadmap when following the preceding steps.
NOTE The removal option is grayed out if all of the selected contracts are not currently assigned to the roadmap.
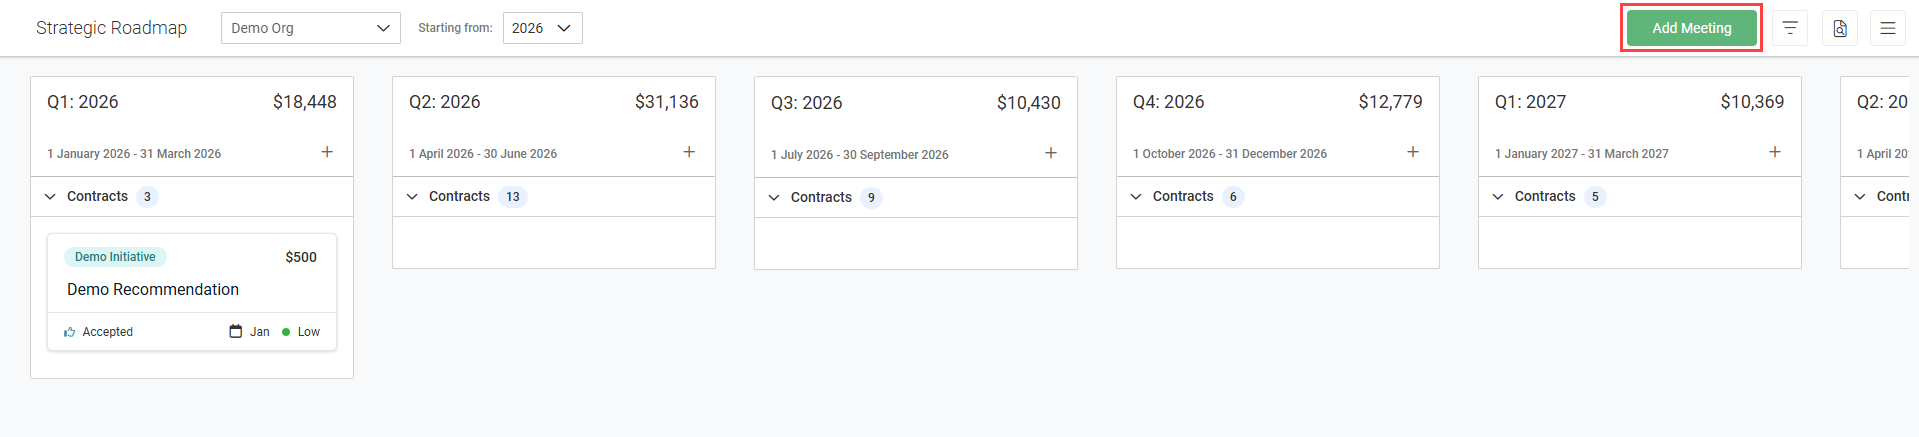
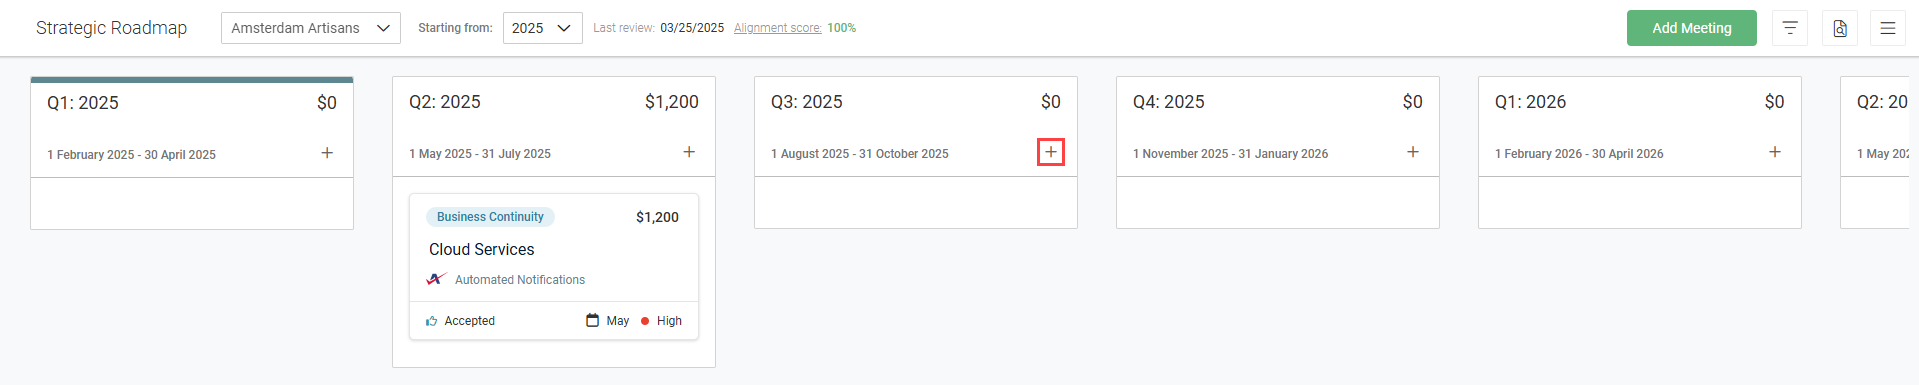
Once a contract is added to the roadmap, it is available to manage on the Strategic Roadmap page for its organization. Contracts are displayed in the quarters that align with their billing cycle. A contract tile will appear in every quarter that includes a billing date for that contract, starting from its first billing date and continuing through its last billing date.
EXAMPLE The start of the fiscal year is set to January (via the Strategy Profile settings available from the hamburger menu in the upper-right corner of the page).
If a contract's billing cycle is monthly, its first billing date is November 1, 2026, and its last billing date is November 1, 2027, the contract appears in the Q4: 2026, Q1: 2027, Q2: 2027, Q3: 2027, and Q4: 2027 quarter tiles.
If a contract's billing cycle is annually, its first billing date is November 1, 2026, and its last billing date is November 1, 2027, the contract appears in the Q4: 2026 and Q4: 2027 quarter tiles.
Complete the following steps to view contracts added to the roadmap on the Strategic Roadmap page:
- In the top navigation menu click Strategy.
- From the Strategic Roadmap page, select the organization you wish to manage contracts for from the drop-down menu in the upper-left corner of the page.
- Select the year you wish to view contracts for from the Starting from drop-down menu next to the organization menu.
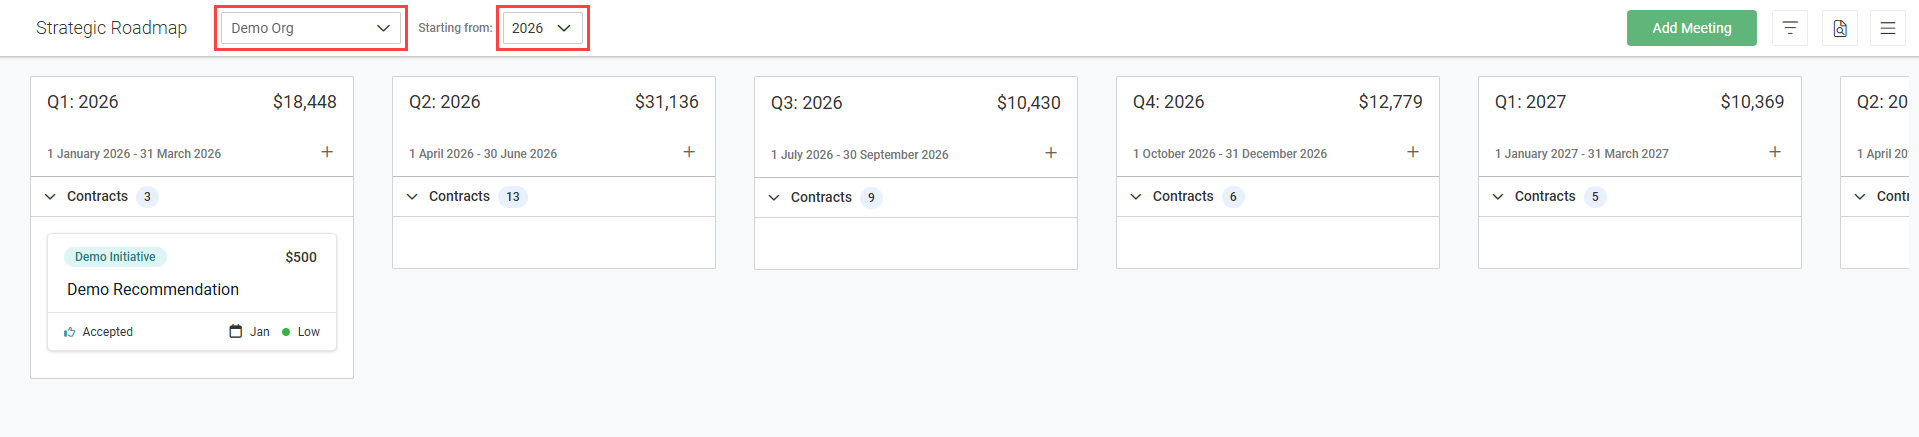
- Scroll through the list of quarter tiles as necessary, and click the Contracts drop-down menu in any quarter to view the contract(s) for that quarter. The drop-down menu shows the total number of active and inactive contracts for that quarter.
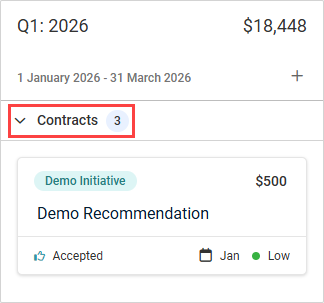
Contract tile details
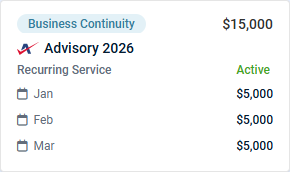
Each contract tile displays the following details:
- The name of the initiative the contract is assigned to.
- The total quarterly cost of the contract, which is the sum of all contract costs for that quarter.
- The logo of the source of the contract.
- The name of the contract.
- The contract type, either Recurring Service or Fixed Price.
- The contract status, either Active or Inactive.
- The cost of the contract per month based on the contract's billing cycle.
EXAMPLE If the billing cycle for a contract is bi-weekly, the multiple payments in a single month are combined to reflect the total cost of the contract for that month.
NOTE Contract data (other than the assigned myITprocess initiative) cannot be edited from this page and must be managed in Autotask. The contract tiles cannot be dragged and dropped to different quarters.
Use the filter menu in the upper-right corner of the page to search or filter for specific contracts by name or initiative.
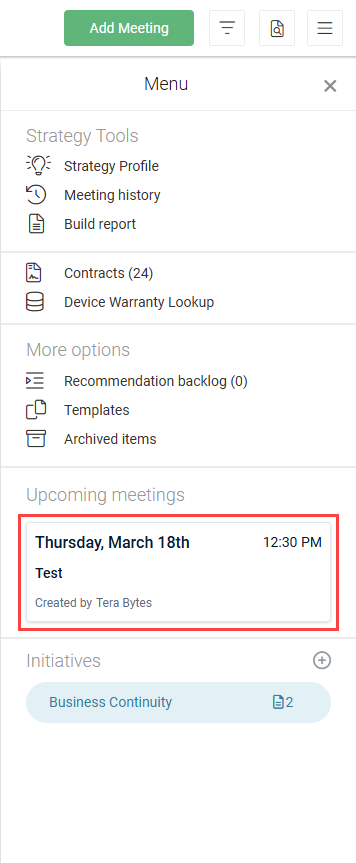
To view the list of all contracts from the selected organization, click the hamburger menu in the upper-right corner of the page and select Contracts. Refer to Contracts page. The Contracts menu item displays the total number of active and inactive contracts for that organization for all years.
Viewing and managing individual contracts
Click a contract tile to open its details and services (Recurring Service contracts) or its details and milestones (Fixed Price contracts), which are also available on the Contracts page. For an overview of these details, refer to View individual contract details, services, and milestones.
To remove a contract from the roadmap, click the three-dot menu icon in the upper-right corner of the contract details dialog box and select Remove from Roadmap. The contract can be re-added to the roadmap from the Contracts page at any time.
To open the contract in Autotask, click View in Autotask.
To help drive meeting agendas, contracts added to the roadmap can be added to meetings from the Strategic Roadmap page. Complete the following steps to add one or more contracts synced from Autotask to a myITprocess meeting:
- In the top navigation menu click Strategy.
- From the Strategic Roadmap page, select the organization you wish to manage contracts for from the drop-down menu in the upper-left corner of the page.
- Click Add Meeting in the upper-right corner of the page.
- In the Create Meeting pane that opens, fill in the meeting details. To learn about meetings in myITprocess, refer to Adding and managing meetings.
- Click Continue.
- Drag and drop one or more contracts into the box to add them to the meeting agenda. You have the option to add the same contract from different quarters to the meeting. Each contract tile in the meeting agenda displays the applicable quarter and quarterly cost.
- If required, drag and drop the tiles within the box to change the order of the contracts (and recommendations, if applicable) in the meeting agenda.
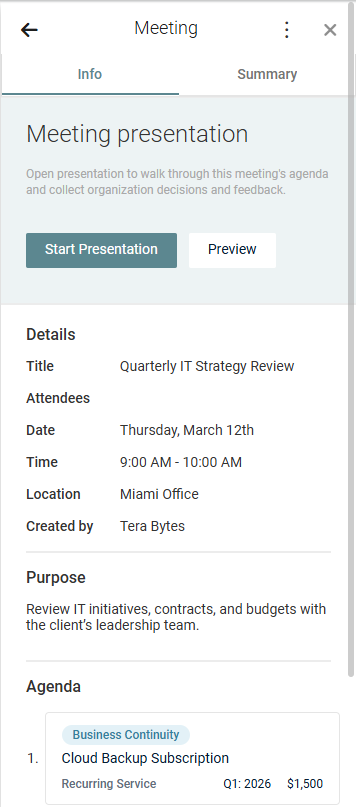
- Click Create to create the meeting and initiate a meeting confirmation email to attendees. If the Send meeting agenda to participants check box is selected, the attendees will receive a PDF attachment of the meeting agenda, which displays the details of any contracts and recommendations you added to the meeting.
- In the Upcoming meetings section at the bottom of the pane, you can click the tile to take further action.
- Click Preview to cycle through a preview of the meeting, including an overview of the agenda, the details of any contracts and recommendations added to the meeting in the order in which you arranged them, and a meeting recap. From the three-dot menu in the upper-right corner of the pane, you can access additional options, including the option to edit the meeting and its added contracts.
NOTE You also have the option to add one or more recommendations to the meeting agenda.

Contracts synced from Autotask are automatically added to Budget Report content and Strategic Roadmap content within QBR reports created in myITprocess.
Complete the following steps to create a QBR report that includes contract details:
- In the top navigation menu click QBR Report Builder.
- In the upper-right corner of the page, click Create.
- From the Organization drop-down menu, select an organization that contains contracts you wish to report on.
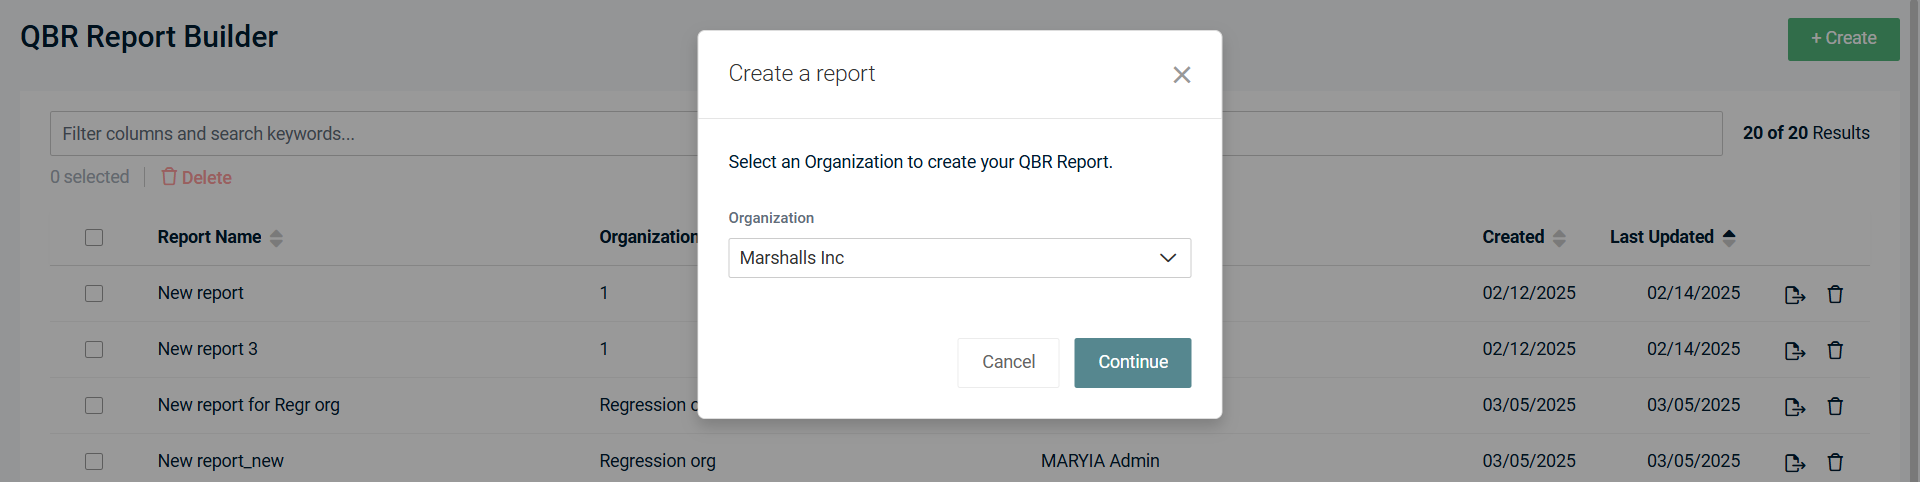
- Click Continue.
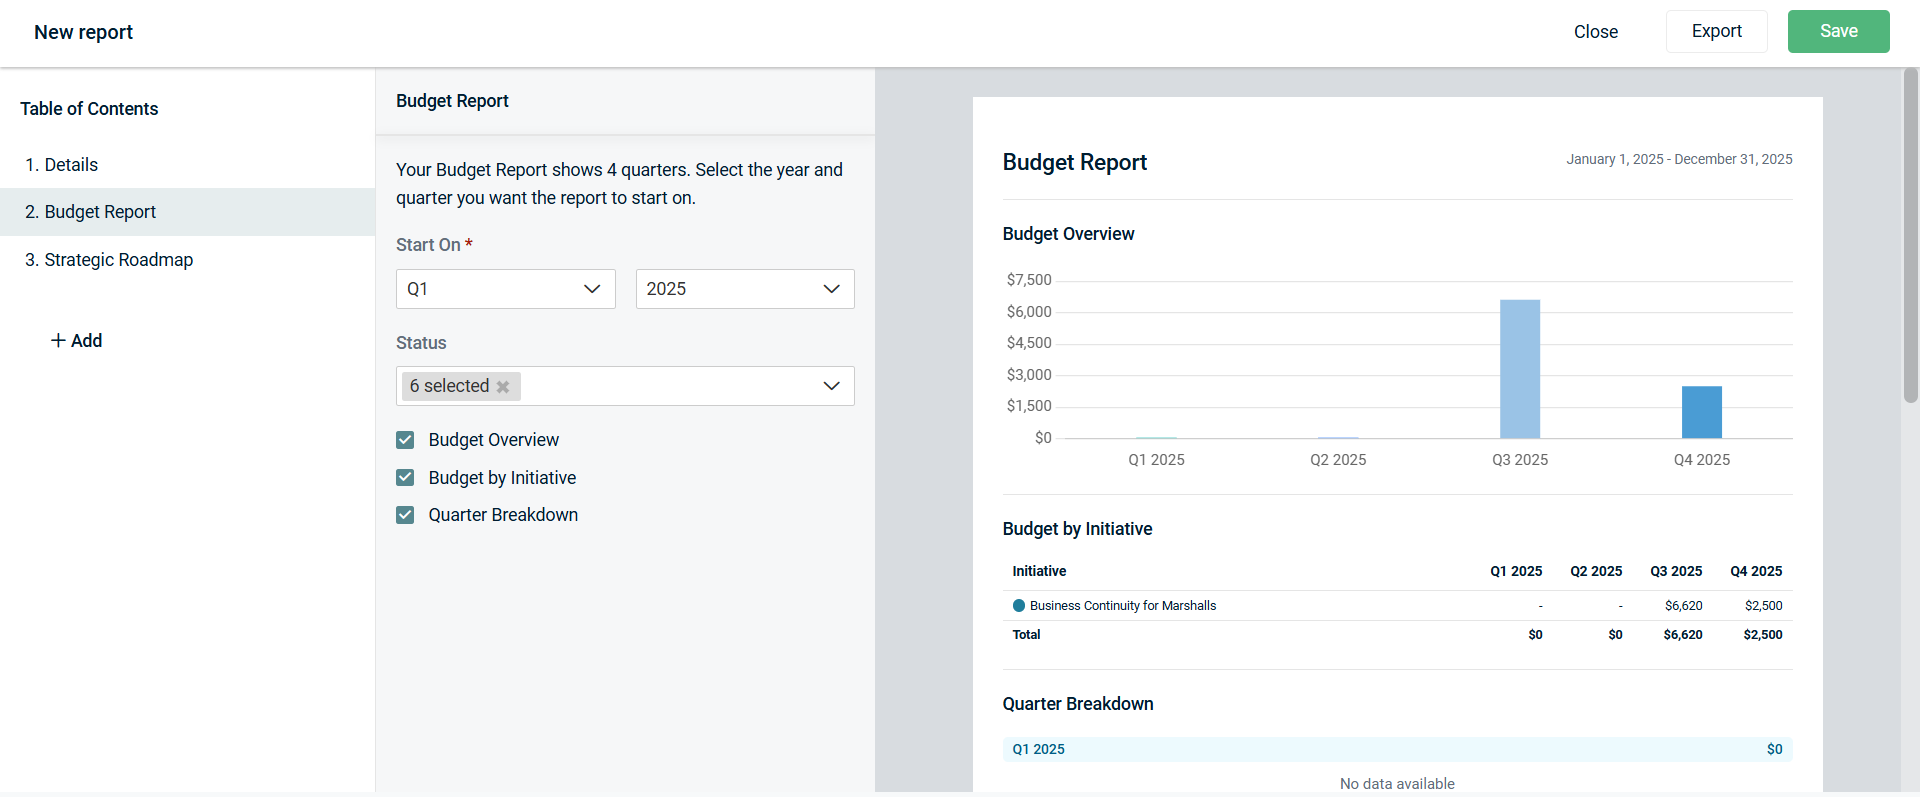
- In the Table of Contents section on the left side of the page, click Add. From the list of report options, select Budget Report or Strategic Roadmap. You have the option to add both options in one report, more than one Budget Report in one report, and more than one Strategic Roadmap in one report.
- From the Start On drop-down menus, select the quarter and year you wish to view contract details for. Configure other report settings as desired. For Strategic Roadmap content, the Strategic Roadmap Overview and Contracts check boxes must be selected in the report settings.
- You have the option to export content in PDF format by clicking Export.
- Click Save to add the report to the QBR Report Builder page.
The following contract details are available for the year selected in QBR reports:
Budget Report contract details
NOTE Contracts not yet added to the roadmap are not reflected in the Budget Report content. Refer to Add contracts to the roadmap for the organization.
- Contract prices are reflected in the Budget Overview (per quarter) and Budget by Initiative sections.
- Contract details (name, initiative, contract type, billing cycle, and budget) are reflected in the Quarter Breakdown section.
- If a contract includes services, services information is reflected in the Quarter Breakdown section.
Strategic Roadmap contract details

NOTE The Strategic Roadmap Overview and Contracts check boxes must be selected in the report settings in order for the Strategic Roadmap content to include contract details.
- Contract tiles are reflected in the Strategic Roadmap Overview section.
- Contract details (name, contract type, billing cycle, budget, and description) are reflected in the Contracts Breakdown section.
- If a contract includes services, services information is reflected in the Contracts Breakdown section.
QuickAction for Autotask Opportunity
The following section describes how to leverage the QuickAction for Autotask Opportunity automation that is part of this integration.
Syncing a new or existing Autotask opportunity to a myITprocess Strategic Roadmap recommendation allows you to view and manage their details from either platform.
NOTE Formatting and images from an opportunity will not appear in the recommendation.
To sync an existing Autotask opportunity to a recommendation or create a new Autotask opportunity from within myITprocess to sync to recommendations, complete the following steps in myITprocess:
- In the top navigation menu click Strategy.
- From the drop-down menu in the upper-left corner of the page, select a myITprocess organization that is mapped to an Autotask organization to populate the Strategic Roadmap for that organization. Refer to Map myITprocess organizations to Autotask organizations.
- In the quarter you wish to create a myITprocess recommendation for, click the + icon.
- To create a new recommendation, click Next. To create a recommendation from a template, select a template and click Next. To learn about recommendation templates, refer to Creating initiative and recommendation templates.
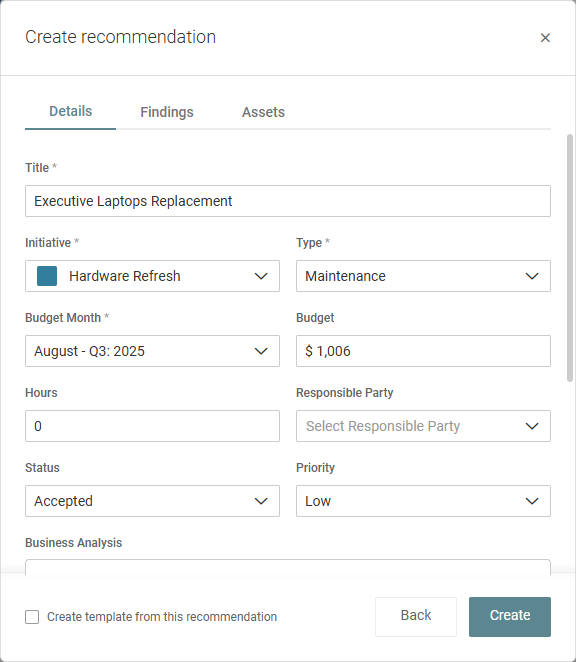
- Fill in the recommendation details.
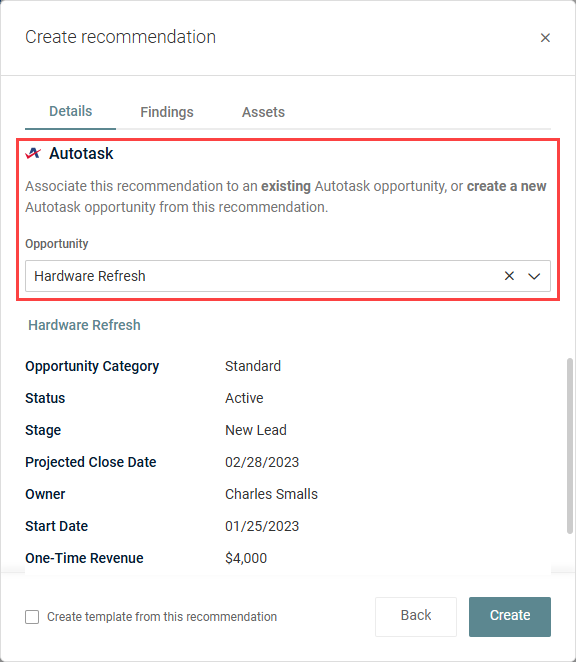
- Scroll to the Autotask section, and click the Search or Create an Opportunity drop-down menu.
- You have the option to sync an existing Autotask opportunity from the Standard and Custom categories to this recommendation or to create a new Autotask opportunity from within myITprocess to sync to this recommendation and future recommendations. If you select an existing opportunity from the Opportunity drop-down menu, the details from Autotask will be automatically populated. Click the opportunity name or View more fields in Autotask to open the opportunity in Autotask.
- Once you are finished configuring the recommendation, click Create.
To create a new Autotask opportunity instead, click Create Opportunity from the bottom of the Opportunity drop-down menu.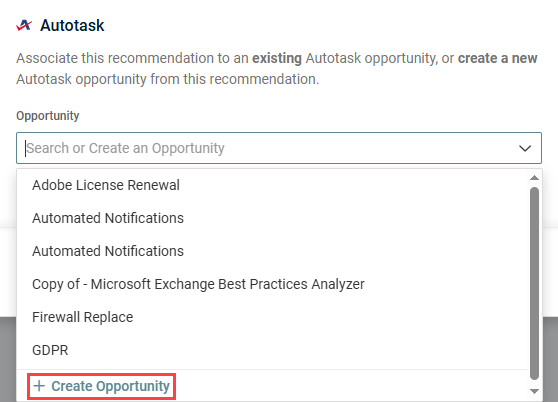
The Name field will be automatically populated as the recommendation name but can be edited. The opportunity will be created in the Standard category by default. Fill in the preliminary fields to configure the opportunity. Once created from myITprocess, additional fields will be available in Autotask to further populate the opportunity. Click Create to create the opportunity in Autotask, automatically associate it with this recommendation, and finish configuring the recommendation.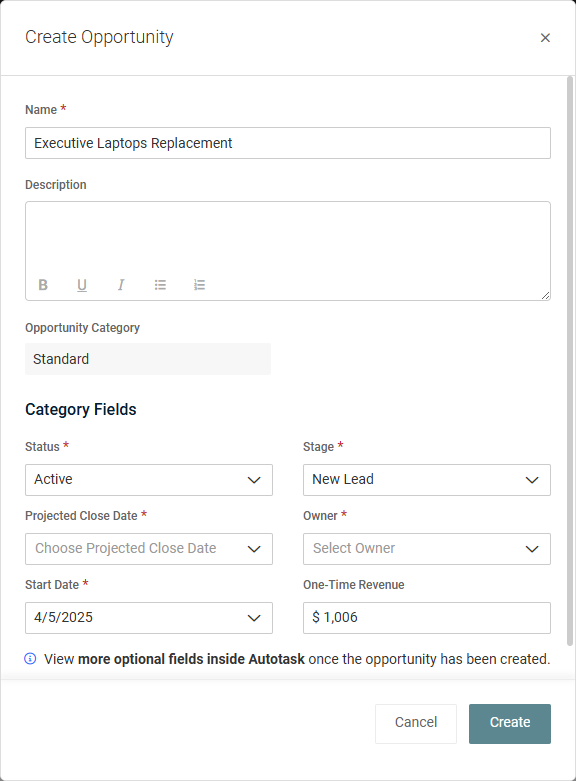
Learn about recommendations in the myITprocess Help system.
The Autotask opportunity will be added to the recommendation in the organization's Strategic Roadmap and can be opened from myITprocess at any time.
NOTE You have the option to sync an Autotask opportunity to an existing recommendation by opening the recommendation and scrolling to the Autotask section.
QuickAction for Autotask Ticket
The following sections describe how to leverage the QuickAction for Autotask Ticket automation that is part of this integration.
BEFORE YOU BEGIN You must add your clients' organization templates in myITprocess before you can configure reviews for those organizations. Learn about adding organization templates in the myITprocess Help system.
The option to create Autotask tickets for myITprocess reviews is available when creating reviews and in existing reviews. Enabling this setting automatically creates an Autotask ticket that tracks the total amount of time the review was open.
Creating an Autotask ticket for a new review
To automatically create an Autotask ticket for a review upon creating the review, complete the following steps in myITprocess:
- In the top navigation menu click Alignment.
- In the upper-right corner of the page, click Create Review.
- Fill in the review details and select the Create Ticket in Autotask check box.
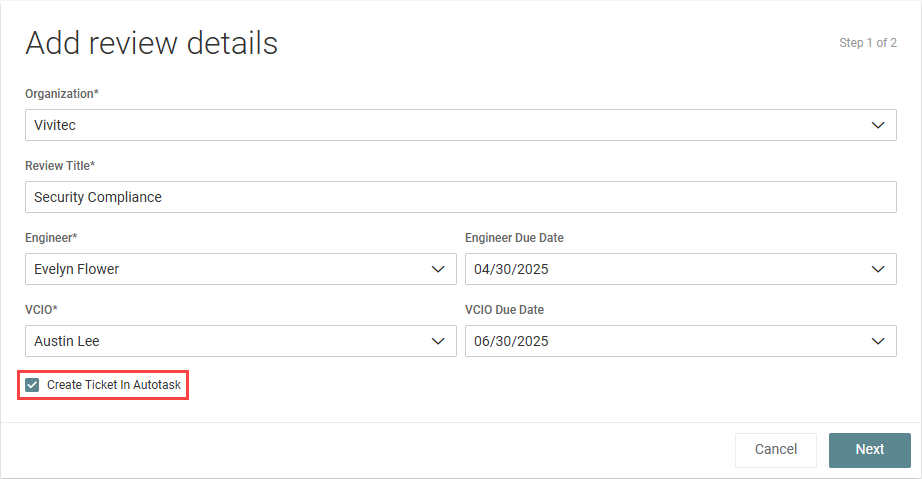
- Click Next.
- Configure the review as desired, and click Create.
NOTE If the selected organization is not already mapped to an Autotask organization, this option is replaced with Setup PSA Organization. Click the link to navigate to the Setup Organizations page to map the organization to an Autotask organization. Refer to Map myITprocess organizations to Autotask organizations.
The ticket summary will be automatically populated as New Review ['Review Title'] created and the description as New Review ['Review Title'] created by [creator name]. Included categories: [list of categories included in the review] and can be edited in Autotask.
Learn about reviews in the myITprocess Help system.
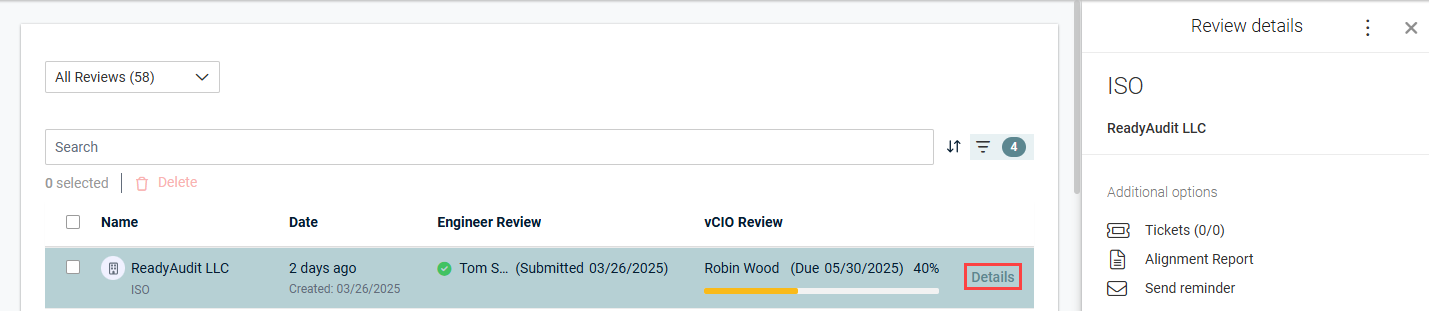
Creating an Autotask ticket for an existing review
To create an Autotask ticket for an existing review, complete the following steps in myITprocess:
- In the top navigation menu click Alignment.
- From the drop-down menu at the top of the list, select either My Reviews to filter the list by reviews you created, or select All Reviews to populate a list of all reviews in the account.
- Search or filter for the review you want to create a ticket for, and click Details.
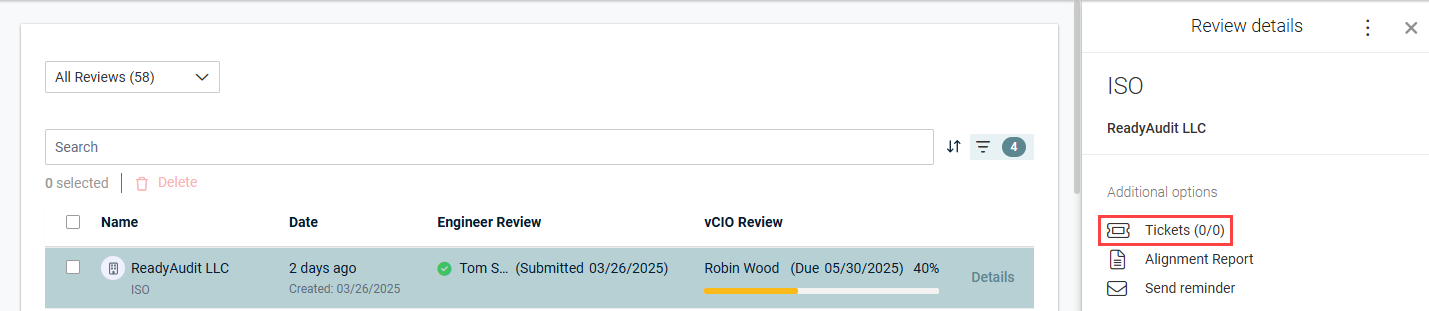
- Click Tickets, which is available only if the organization is mapped to an Autotask organization. Refer to Map myITprocess organizations to Autotask organizations.
- In the Review tab, which is selected by default, click Add to create a ticket for the review in its entirety.
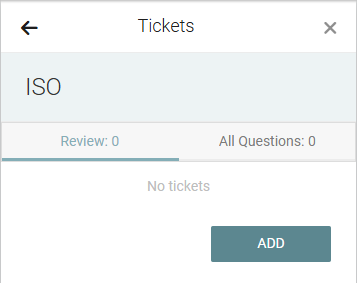
- Enter a custom summary and description that will appear in the ticket.
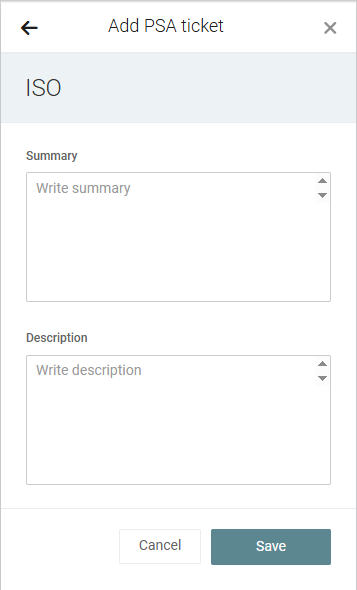
- Click Save to create the ticket.
NOTE This option is also available if you open the review and click the menu in the upper-right corner of the page.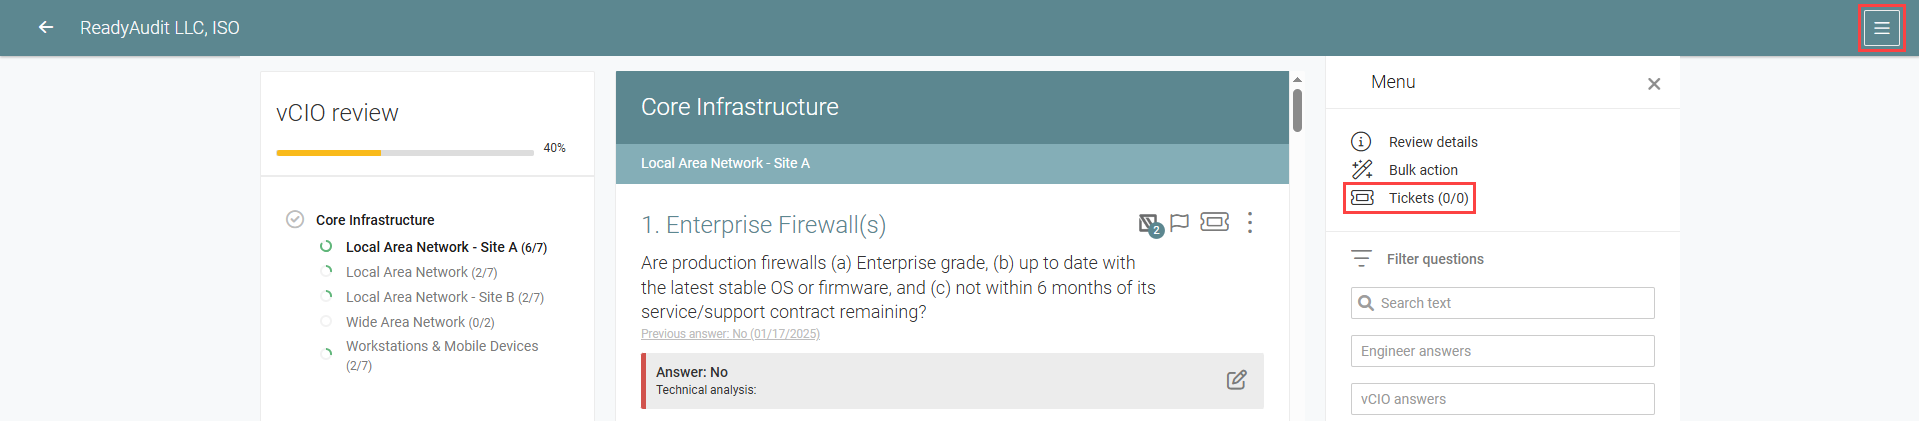
NOTE You have the option to create more than one ticket for a single review. To do so, click + in the Review tab of the Tickets pane.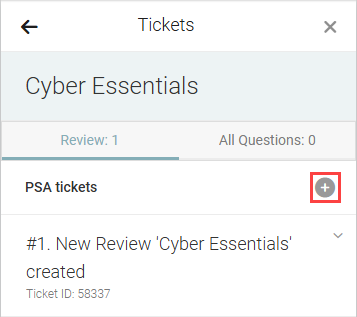
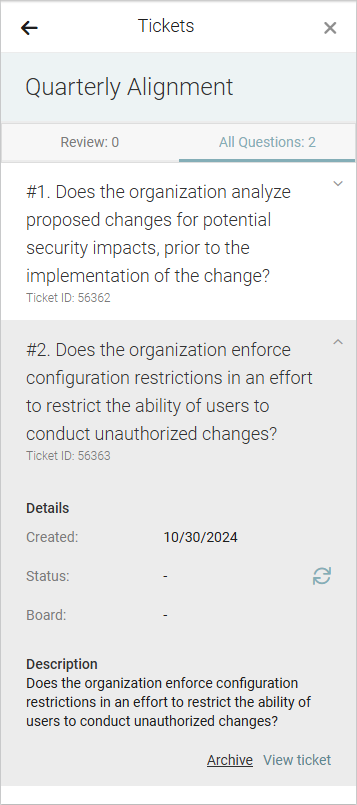
The option to create Autotask tickets for questions in myITprocess reviews is available in existing reviews. These tickets can be sent to a dedicated board with the benefit of someone in centralized services or the support desk remediating that issue.
To create an Autotask ticket for a question in a review, complete the following steps in myITprocess:
- In the top navigation menu click Alignment.
- From the drop-down menu at the top of the list, select either My Reviews to filter the list by reviews you created, or select All Reviews to populate a list of all reviews in the account.
- Click a review to open it.
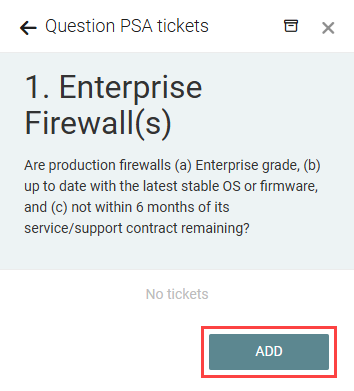
- Locate the question you want to create a ticket for, and click the ticket icon.

- Click Add.
- The Summary field for the ticket is automatically populated with the review question and can be edited. This field is limited to 500 characters.
- Optionally, enter a description that will appear in the ticket.
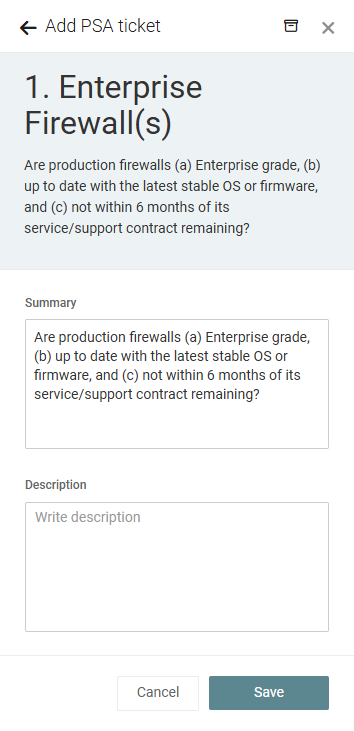
- Click Save to create the ticket.
NOTE You have the option to create more than one ticket for a single question. To do so, open the review, click the ticket icon for a question that already has one or more tickets associated with it, and click +.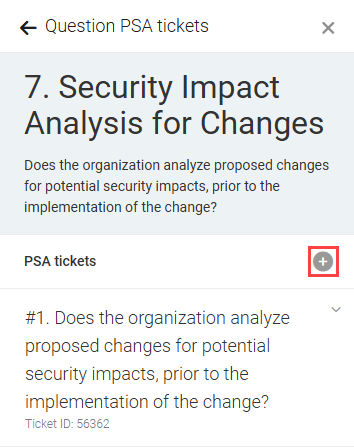
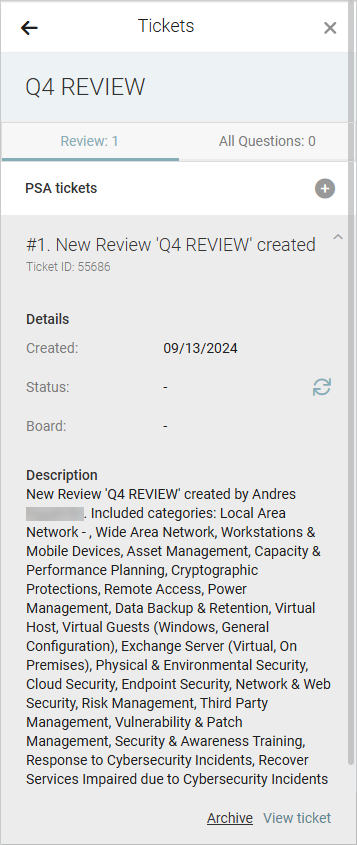
Once a ticket is created for a myITprocess review or question within a review, you can view the ticket details and open the ticket in Autotask directly from the review Tickets pane in myITprocess. Expand the ticket summary to see the ticket details, including the summary, ticket ID, date created, status, board, and description. You can edit these details from the Autotask ticket.
To open the ticket in Autotask , click View ticket.
To sync the latest ticket updates from Autotask to myITprocess, click the refresh icon ⟳.
To archive the ticket from within myITprocess, click Archive, and you will be prompted to confirm this action.