Device Lifecycle Management overview
NAVIGATION Home > (click the Device Warranty Lookup widget)
NAVIGATION Strategy > (select an organization) > (click the menu icon ![]() ) > Device Warranty Lookup
) > Device Warranty Lookup
The Device Lifecycle Management feature allows you to manage the complete lifecycle of a device from procurement to disposal. Warranty and device lifecycle information from Acer, Cisco Meraki, Datto Networking, Dell, HP, Lenovo, and SonicWall is available directly in myITprocess.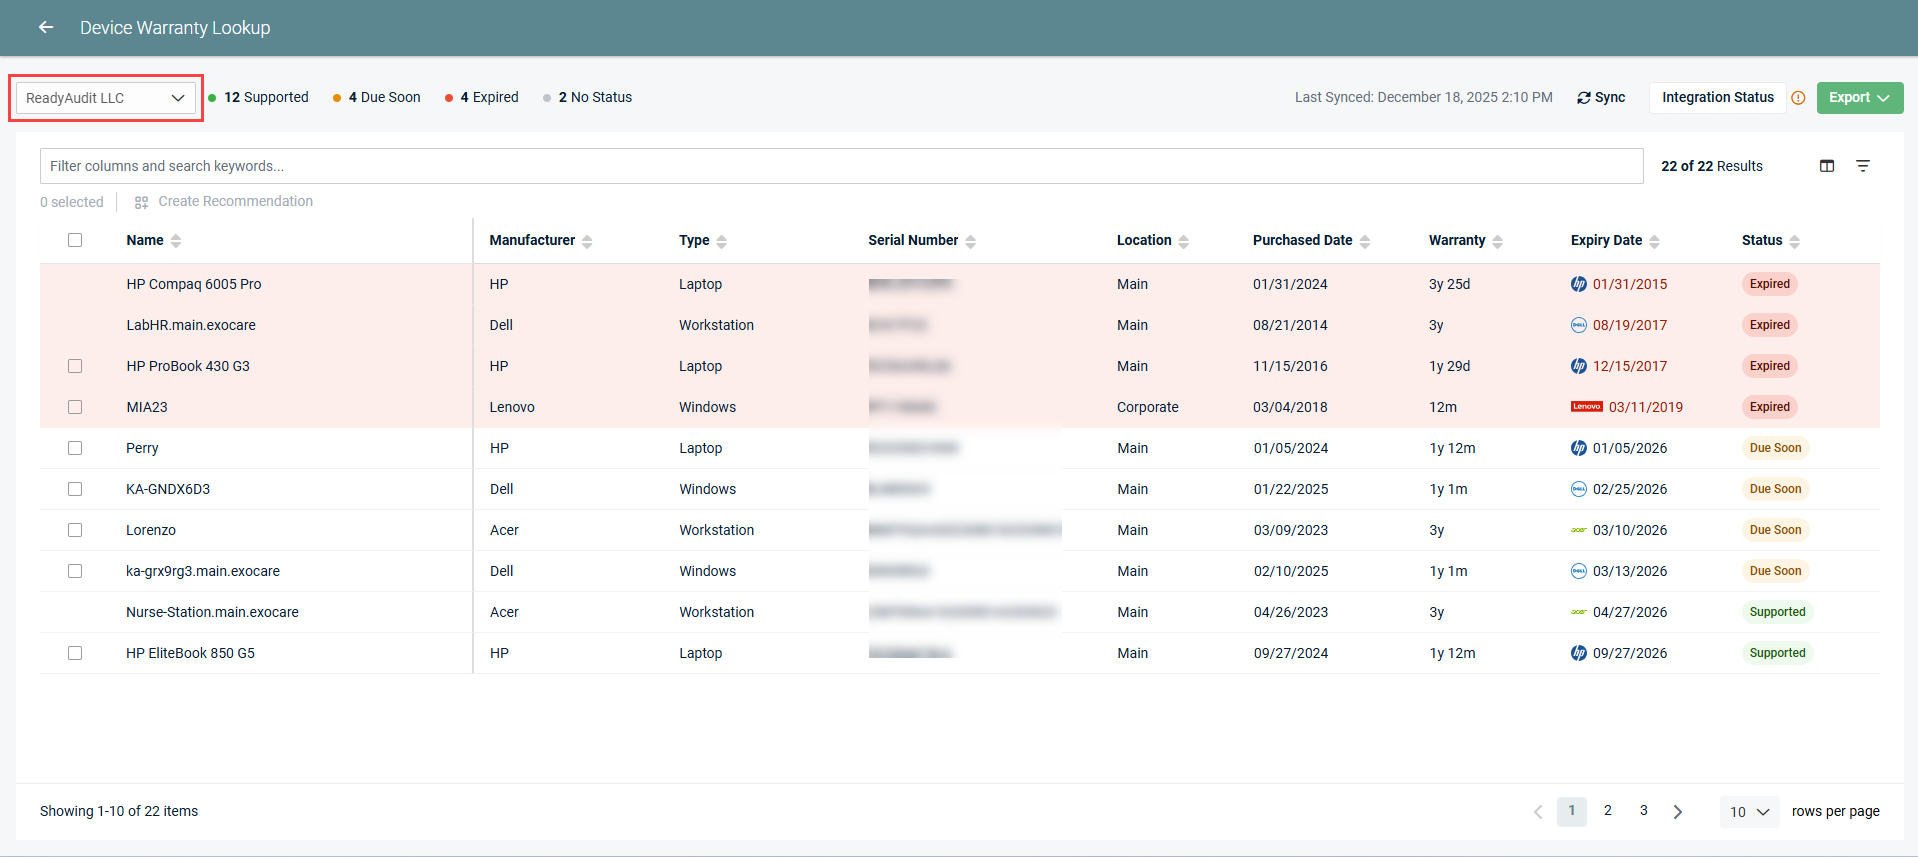
Managing your device lifecycle integrations
To sync devices to myITprocess for a warranty lookup, you must configure the integrations that are applicable to your workflow. Refer to the following articles:
Requirements
- Ensure you have mapped myITprocess organizations to the corresponding organizations in the integrated data source. Refer to Performing organization mapping.
- In IT Glue, configurations (devices) must have the Manufacturer and Serial Number fields populated in order for the warranty lookup to work.
Automatic sync timing
- Warranty information for Cisco Meraki, Datto Networking, and SonicWall devices is synced to myITprocess instantly when the page loads.
- Warranty information for Acer, Dell, HP, and Lenovo is synced to myITprocess every 24 hours.
Clicking Sync on the Device Warranty Lookup page allows you to manually retrieve the latest device warranty data in myITprocess. Refer to Sync device data.
Device Warranty Lookup widget
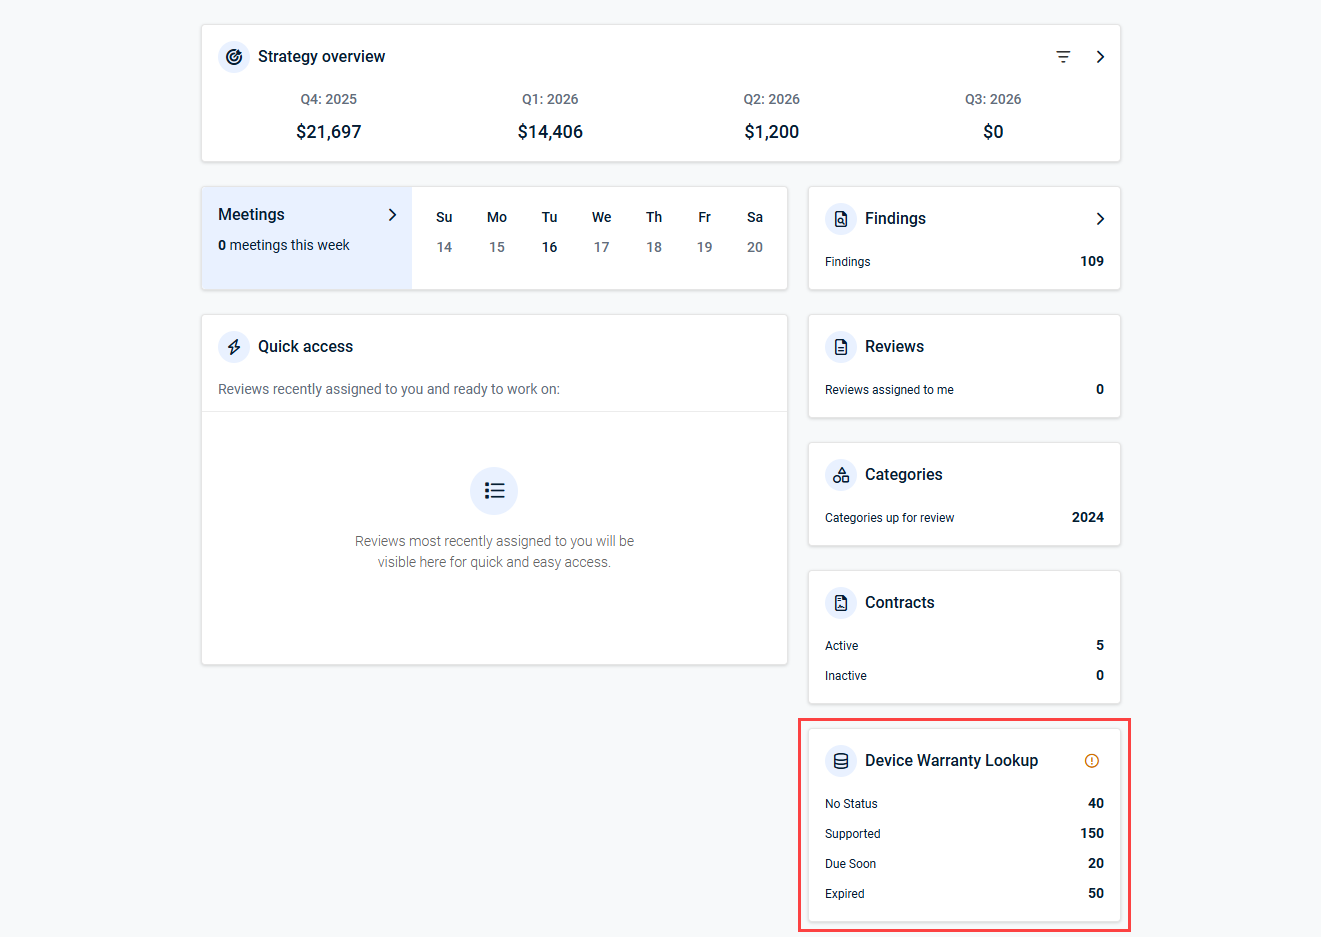
Once at least one organization from a device lifecycle integration is mapped to myITprocess, the Device Warranty Lookup widget appears on the home page dashboard. This widget displays the total number of devices from all organizations synced to myITprocess via device lifecycle integrations, with devices grouped by status. Refer to Status in Device information and deduplication.
A warning icon ![]() is displayed if at least one device lifecycle integration is not successfully connected. Hovering over the icon reveals the connection statuses of the integrations.
is displayed if at least one device lifecycle integration is not successfully connected. Hovering over the icon reveals the connection statuses of the integrations.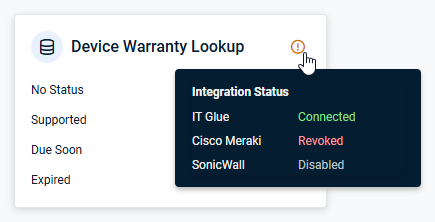
To view full, organization-level integration status details and resolve any issues, click the widget to open the Device Warranty Lookup page. Refer to View device lifecycle integration statuses.
Device Warranty Lookup page
Follow either of the navigation paths at the top of this article to access the Device Warranty Lookup page, where you can view organization-level device statistics and manage synced devices.
Select an organization from the drop-down menu in the upper-left corner of the page to view devices synced for that organization.
Devices are grouped into the counts displayed next to the organization drop-down menu (Supported, Due Soon, Expired, and No Status). Refer to Status in Device information and deduplication.
Use the horizontal scroll bar at the bottom of the list to view all columns.
Searching, filtering, and sorting
You can search for a specific device in the list by entering all or part of its name, manufacturer, type, serial number, or any other selected column value in the Filter columns and search keywords bar at the top of the page. The results are narrowed as you type.
You can filter the list of devices by clicking the filter icon ![]() in the upper-right corner of the page. From one or more of the following drop-down menus, select the applicable checkboxes to filter by. The results are automatically narrowed after selecting each checkbox.
in the upper-right corner of the page. From one or more of the following drop-down menus, select the applicable checkboxes to filter by. The results are automatically narrowed after selecting each checkbox.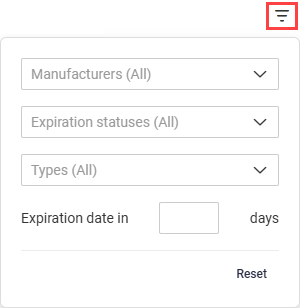
- Manufacturers: Filter by one or more device manufacturers (for example, Dell, HP, Lenovo, Acer, Microsoft, or VMware, Inc.).
- Expiration statuses: Filter by No Status, Supported, Due Soon, or Expired.
- Types: Filter by device type (for example, Windows, Workstation, or Laptop).
- Expiration date in [ ] days: Enter a number of days to display only devices with an Expiry Date value within that time frame.
Click Select All at the top of a drop-down menu to select or clear all the checkboxes in that menu at once.
Click Reset at the bottom of the filter pane to clear all filter selections.
You can sort all columns in ascending or descending order.
You can select the number of results displayed per page and cycle through those pages using the pagination control in the lower-right corner of the page.
Device information and deduplication
As soon as your integrations are set up and organizations are mapped accordingly, myITprocess automatically enriches the list of devices on the Device Warranty Lookup page with warranty information from vendors.
Because the same device can be managed through more than one integration (for example, IT Glue, where devices are called configurations, and Cisco Meraki, SonicWall, or Datto Networking), myITprocess deduplicates records based on the device's unique serial number, merging records for the same serial number into a single device.
The following table outlines the synced device data fields available in myITprocess. If a field's priority 1 source does not contain data, myITprocess displays the value from the priority 2 source, if available, or leaves the field blank.
| myITprocess field | Description | Priority 1 source | Priority 2 source |
|---|---|---|---|
| Name | The name of the device. | IT Glue | Vendor |
| Manufacturer | The name of the device manufacturer. | Vendor | IT Glue |
| Type | The product type (for example, Laptop). | Vendor | IT Glue |
| Serial Number | The unique serial number of the device. myITprocess uses this value to deduplicate devices across sources. | Records are matched across sources. | |
| Location | The location assigned to the device, derived from the Location field for the configuration in IT Glue. | IT Glue | |
| Purchased Date | The date on which the device was purchased. | Vendor | IT Glue |
| Warranty | The length of the manufacturer warranty (for example, 1y for 1 year or 12m for 12 months). | Vendor | |
| Expiry Date | The date on which the device warranty expires. After a lookup is performed, the expiry date is marked with the manufacturer logo. If no logo appears, myITprocess could not retrieve the expiration date from the vendor and is displaying the value documented in IT Glue instead, if available. | Vendor | IT Glue |
| Status |
Each device is assigned one of the following statuses, based on its expiry date and your device warranty status setting. Refer to Device warranty status setting.
|
myITprocess | |
| Contact | The contact person associated with the device, derived from the Contact field for the configuration in IT Glue. | IT Glue | |
| Age | The age of the device, calculated from the purchased date. | myITprocess (calculated from the Purchased Date field) | |
| Firmware | The firmware version installed on the device. | Vendor | |
| End-of-Life | The date on which the manufacturer ends support for the device, derived from manufacturer lifecycle data. | myITprocess | |
| Asset Tag | The asset tag assigned to the device. | IT Glue | Vendor |
| Model | The model name or number of the device. | Vendor | IT Glue |
| OS | The operating system running on the device, derived from the Operating System field for the configuration in IT Glue. | IT Glue | |
| CPU | The processor installed in the device, derived from the CPU field for the configuration in IT Glue. | IT Glue | |
| RAM | The amount of memory installed in the device, derived from the RAM field for the configuration in IT Glue. | IT Glue | |
| Licenses | The software licenses associated with the device. If at least one license associated with the device is expired, the count is displayed in red, even if the device itself is not expired. | Vendor | |
| IP Address | The IP address assigned to the device. | Vendor | IT Glue |
| MAC Address | The hardware identifier assigned to the device's network interface. | Vendor | IT Glue |
| Last Login User | The user who most recently logged in to the device. | IT Glue | |
When a device record has been merged from more than one source, a banner is displayed on the device details pane and on the recommendation asset details indicating that the device has multiple sources. Refer to View device details.
Device warranty status setting
To help teams proactively manage devices nearing expiration, users with Full permission for Account settings can schedule automatic transitioning of the device warranty Status field. In the Warranty tab on the Account Settings page, select how many days before the device’s warranty expires that its status will change to Due Soon. Refer to Status in Device information and deduplication.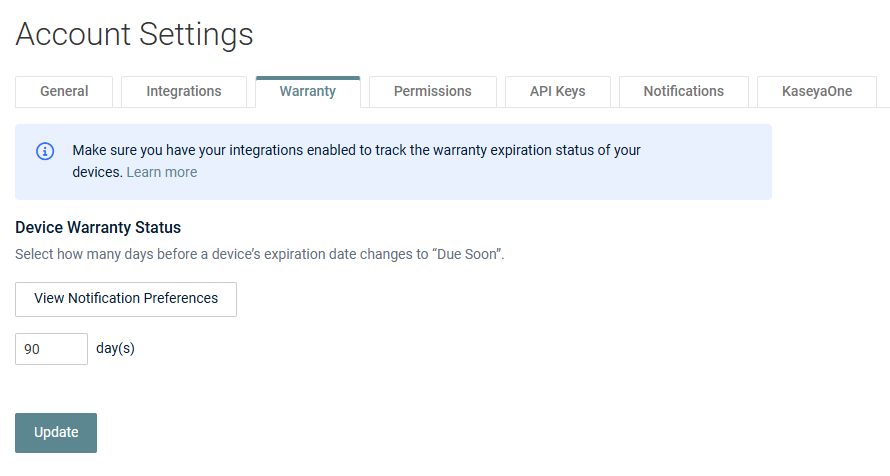
This setting is global and applies to any device synced through a device lifecycle integration. It can be configured even if no integrations are set up yet; however, you will not see any devices with a Due Soon status until an integration is connected and organizations are mapped.
How to...
Click Integration Status in the upper-right corner of the Device Warranty Lookup page to view the connection status of each device lifecycle integration for the selected organization. A warning icon ![]() is displayed if at least one integration is not successfully connected.
is displayed if at least one integration is not successfully connected.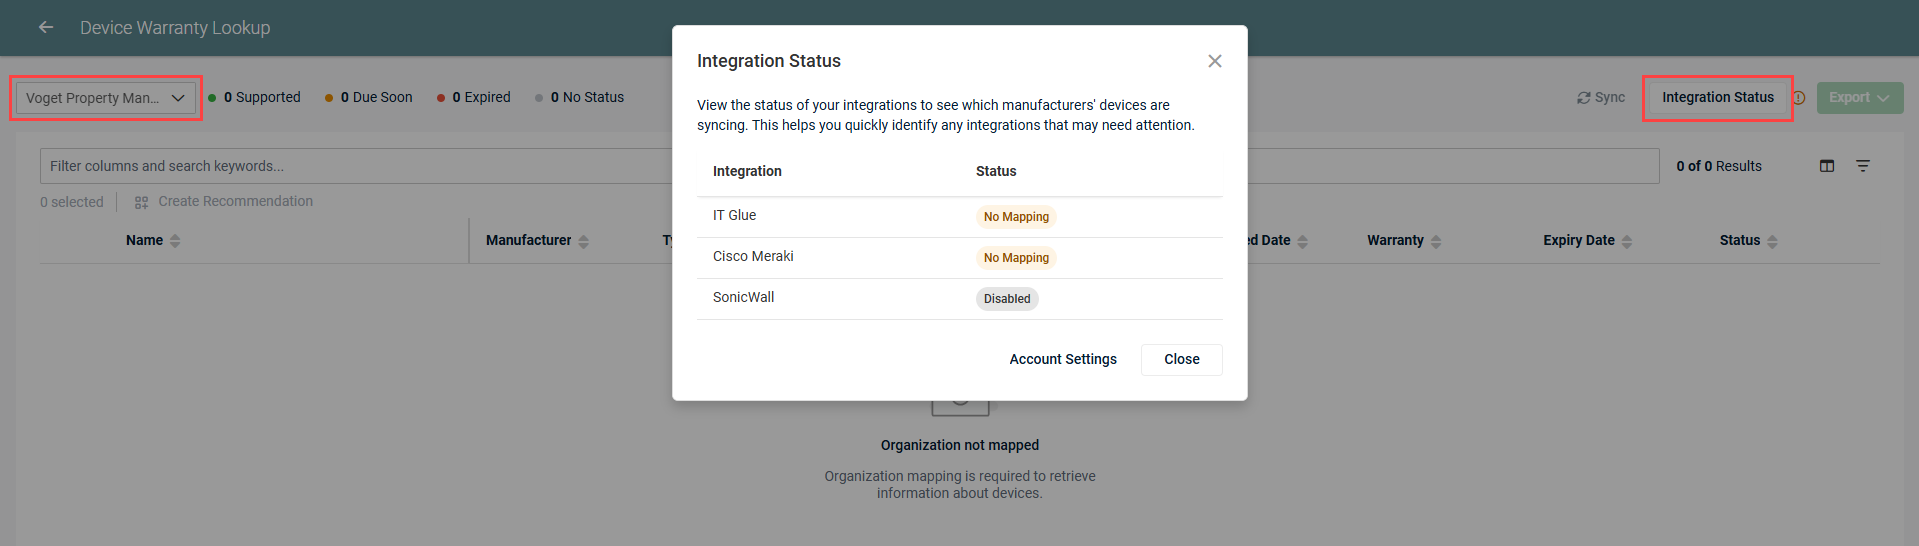
Each integration displays one of the following statuses:
- Connected: The integration is set up and successfully connected.
- Disabled: The integration is not set up, or the connection was removed.
- No Mapping: The integration is connected, but the organization currently selected in the drop-down menu in the upper-left corner of the page has not been mapped to its corresponding organization in the integrated data source. Refer to Performing organization mapping.
- Revoked: The API key for the integration has been revoked and needs to be regenerated.
- Connection Error: myITprocess could not connect to the integration.
Users with Full permission for Account settings can navigate to My Account > Account Settings > Integrations to manage integration connections.
TIP To reconnect an integration, check your API credentials in your integration settings and generate a new API key, if required. Refer to API authentication in myITprocess.
NOTE Device lifecycle integration statuses are also visible at the global level by clicking the warning icon ![]() in the Device Warranty Lookup widget on the home page dashboard.
in the Device Warranty Lookup widget on the home page dashboard.
Click Sync in the upper-right corner of the Device Warranty Lookup page to manually refresh the warranty data for the selected organization. The sync runs in the background, so you do not need to remain on the page while it completes.
The date and time of the most recent sync for the selected organization is displayed to the left of the Sync button (adjusted to your local time zone).
A manual sync can be triggered once every 8 hours per organization. The Sync option is grayed out until the next sync becomes available, if the organization has no mappings, or if IT Glue is not connected.
NOTE A manual sync only overwrites existing values with newer, non-empty data; it does not clear a field that already has data if the manufacturer returns an empty value.
You can customize which columns are displayed in the list, as well as their order, by clicking the column chooser icon ![]() in the upper-right corner of the page. The following options are available:
in the upper-right corner of the page. The following options are available:
- Select or clear the checkbox next to a column name to show or hide that column. Select or clear the Select All checkbox to show or hide all columns at once.
- Drag and drop columns to change the order in which they appear in the list.
- Restore the default column visibility by clicking Restore Default.
NOTE The Name column cannot be hidden from the list.
After clicking Save, your configured list view will persist if you navigate away from the page and return to it.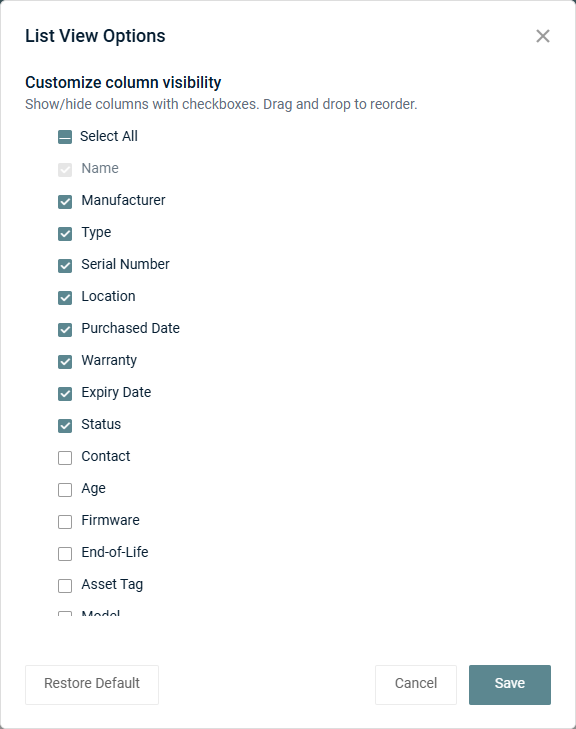
Click a device row to open a pane with additional details about that device.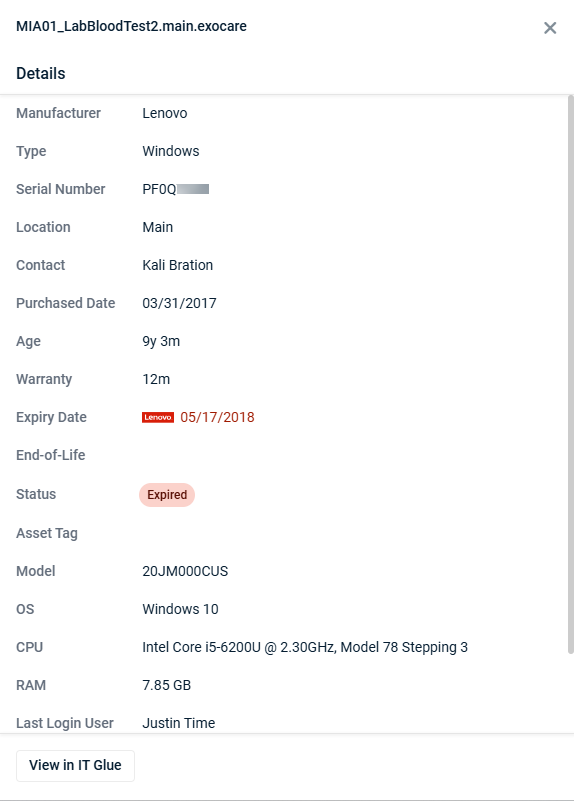
If the device was synced from a manufacturer that returns license information (for example, SonicWall), a Licenses field is also displayed.
The Recommendations section lists any recommendations that have been created for the device, along with their target quarter, budget, and status. Click Create Recommendation to add a new one. Refer to Create a recommendation for a device. Clicking a recommendation tile opens that recommendation on the Strategic Roadmap for the organization.
Click View in [source] (for example, View in IT Glue) at the bottom of the pane to open the device record in the source it was synced from.
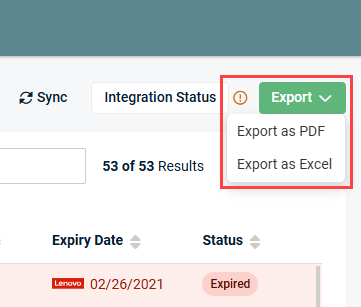
You can export the list of devices on the Device Warranty Lookup page to an Excel workbook or as a PDF document with all your current settings applied, including column selections, filters, sorting, and search.
NOTE All visible data is exported, regardless of whether any rows are currently selected.
Complete the following steps:
-
Click Export in the upper-right corner of the page.
-
To export the data as a PDF document, click Export as PDF. To export the data to an Excel workbook, click Export as Excel. The file is downloaded to the default download location on your device.
You can create a recommendation for a device listed on the Device Warranty Lookup page as follows:
- Click the row of the device for which you wish to add a recommendation.
- In the Recommendations section in the pane that opens on the right side of the page, click Create Recommendation.
- Select either New recommendation to create a recommendation from scratch, or select a recommendation from the template library. Refer to Creating initiative and recommendation templates.
- From the Assets tab of the recommendation (when viewed from the Device Warranty Lookup page or from the Strategic Roadmap for the organization), you can add devices from different sources to that recommendation. Select the source you want to add the device from (for example, IT Glue or Cisco Meraki) from the drop-down menu, search for and select the asset, and then repeat the step to add assets from another source.
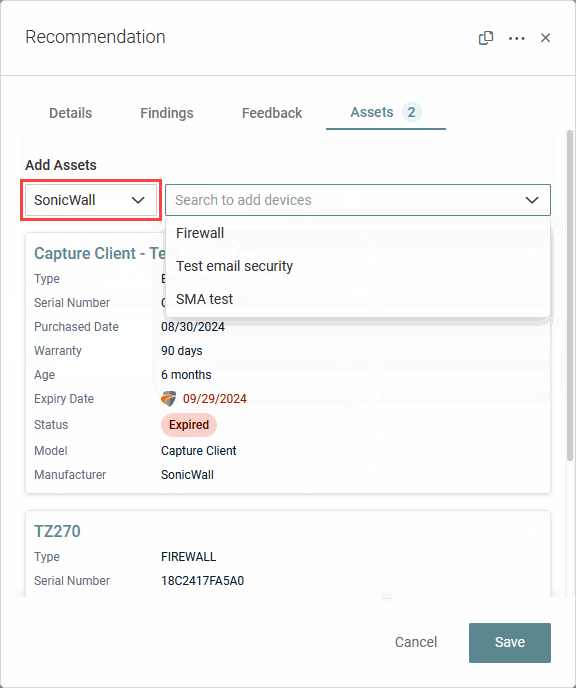
NOTE If the organization has a mapping to only one integration, the source drop-down menu is disabled and defaults to that source.
To create a recommendation for devices in bulk, select the checkboxes next to the applicable devices, and click Create Recommendation in the upper-left corner of the page. To select all devices at once to create a recommendation for, select the checkbox in the list header.
TIP Filter the list by the group of devices you want to create a recommendation for. Refer to Searching, filtering, and sorting.
The Hardware Warranty report in provides clear visibility into the warranty status of client devices, helping you identify aging assets, support budget planning, and deliver actionable insights during Quarterly Business Reviews (QBRs) or as needed.
Refer to Hardware Warranty section in QBR Report Builder in Hardware Warranty reporting.


